| Author | Message | ||
| Mitchell Le (Yelcab1)
Member Username: Yelcab1 Post Number: 677 Registered: 11-2001 |
Splitters available from Kragen Auto. | ||
| Gbuff (Gbuff)
New member Username: Gbuff Post Number: 3 Registered: 2-2002 |
Great pix, Tazio, but it looks even better (as does the rest of the car) in the flesh! The Viper-killer from Buffalo..... | ||
| Tazio Nuvolari (Nuvolari)
Member Username: Nuvolari Post Number: 291 Registered: 9-2002 |
Just to answer a few questions as I did not realize this post had be responded to in the past few days. 1. The splitter for the shovel connector is available from auto parts stores or electronic stores. I know finding these can be a little hit and miss so I included the picture in the original post to be printed out and used as a reference. Having a picture when going to the store is much easier than trying to describe 'that thing that you know..goes on the end of the other thing..and then splits..' 2 Mike C is correct, to fit the rivets, the new NAPA blocks need to be opened up one drill size. You already have the drill out for this project and the additional holes will only take about 30 seconds to do. My recommendation is take your measurments and build yourself a set of these on the bench. Once they are done. Installing them takes about 10 minutes each. All you have to do is mark the wires with a pencil and transfer the leads. | ||
| Dr Tommy Cosgrove (Vwalfa4re)
Intermediate Member Username: Vwalfa4re Post Number: 1282 Registered: 5-2001 |
He IS talking about the center of the new fuse block elements. Their center holes are just a tiny bit too small for the 5/32 rivets. They're plastic and a hole is already there so it takes about 2 seconds for each. No big deal. | ||
| Charles Brading (Austin308)
New member Username: Austin308 Post Number: 48 Registered: 6-2003 |
I like this conversion. I hate to touch mine since every thing is working. I think this is a smart upgrade for the car. Will put this on the things to do. This is a great thread thanks for all the pics Taz | ||
| Mike Charness (Mcharness)
Member Username: Mcharness Post Number: 970 Registered: 8-2002 |
Mike, I think he's talking about the centers of the newer black Napa fuse block elements. | ||
| Mike Procopio (Pupz308)
Member Username: Pupz308 Post Number: 511 Registered: 10-2002 |
Drilling! Nobody said nothin' about drilling! Is that the only way to get the old blocks out? | ||
| Scott Anderson (Srandrsn)
Junior Member Username: Srandrsn Post Number: 184 Registered: 4-2001 |
The shovel connectors were hit and miss for me... a local bumber to bumber had them but NAPA didn't. Went to checker and they had everything. The rivots that worked best were 5/32" x 1/4". 1/2" long rivots are way too long. You'll have to drill out the individual fuse blocks for rivots to go through too. | ||
| Byron (Bmyth)
Intermediate Member Username: Bmyth Post Number: 1240 Registered: 10-2002 |
Tazio, Way to go! >> Knowing you saved the KY Jelly for another Ferrari only part: PRICELESS << ROFLMAO!!!  | ||
| Barney Guzzo (Trinacria)
Member Username: Trinacria Post Number: 445 Registered: 8-2002 |
Mike They are in a lot of parts stores up here. I have a bunch of the shovel connectors left over from a project and ended up not needing all of them. If you want them, tell me how many and I could send them to you. | ||
| Mike Procopio (Pupz308)
Member Username: Pupz308 Post Number: 510 Registered: 10-2002 |
Also, Tazio--what were the specs on the rivets you used? 5/32 by ??? | ||
| Mike Procopio (Pupz308)
Member Username: Pupz308 Post Number: 509 Registered: 10-2002 |
Anybody know where to get the double-bladed "shovel" connectors that Tazio mentions here? I haven't had any luck finding them. | ||
| Mike Procopio (Pupz308)
Member Username: Pupz308 Post Number: 508 Registered: 10-2002 |
Note that if you're searching for this part on the napaonline website (www.napaonline.com), you'll need to use a part number without the hyphen. Use 7821240. --Mike | ||
| Scott Anderson (Srandrsn)
Junior Member Username: Srandrsn Post Number: 175 Registered: 4-2001 |
Just finsihed doing this project on my 80 GTSi. Thanks for the great idea... thats why this is such a great site. I added 3 extra blocks for future use and not only that but after doing this mod my tach started working again. Life is good, thanks!! | ||
| Randall (Randall)
Member Username: Randall Post Number: 647 Registered: 1-2003 |
It actually takes two fuse blocks from NAPA. But you can make it solid and add an extra fuse in there to provide power for your car alarm, stereo, neon lit kit, tv, dvd player, PS2 and mini fridge. | ||
| Sam NYCFERRARIS (Sam)
Member Username: Sam Post Number: 396 Registered: 4-2001 |
Hi, Incredible great work and thanks for sharing...I am a little confused...I really need to do this andin the Final Install pic, it looks like the fuses are mounted on a much larer mounting plate and there is lots of room...if there is that much room why bother breaking them apart and mounting them individually and did I miss a step?? | ||
| Gianluca Chegai (Gianluca)
New member Username: Gianluca Post Number: 23 Registered: 5-2003 |
Thank you, Tazio! Gianluca | ||
| Dr Tommy Cosgrove (Vwalfa4re)
Intermediate Member Username: Vwalfa4re Post Number: 1270 Registered: 5-2001 |
OUTSTANDING job! | ||
| Mike Charness (Mcharness)
Member Username: Mcharness Post Number: 936 Registered: 8-2002 |
VERY nicely done! | ||
| Tazio Nuvolari (Nuvolari)
Member Username: Nuvolari Post Number: 282 Registered: 9-2002 |
All of the jumper leads copied the OEM fuse block. If I remember off the top of my head, the left (white) OEM block has the first 3 joined and the other 6 are in pairs of 2. The right (black) OEM block has the first 6 paired off and the last 3 joined together. | ||
| Greg Rodgers (Joechristmas)
Member Username: Joechristmas Post Number: 803 Registered: 3-2001 |
Great pics. Thanks. I see jumper wires in a few areas. How many jump wires did you use? I can't see all of them behind the wires. Did you make jumper wires according to where the fuseblock had connections on the back? | ||
| Mike Procopio (Pupz308)
Member Username: Pupz308 Post Number: 499 Registered: 10-2002 |
Rock On! | ||
| Roger Blakeman (Roger)
Junior Member Username: Roger Post Number: 95 Registered: 2-2002 |
Taz-"OUTSTANDING" Roger B. | ||
| Tazio Nuvolari (Nuvolari)
Member Username: Nuvolari Post Number: 280 Registered: 9-2002 |
I decided to post this in its own thread to make it easier to find in the archives. Here is the pictoral installation procedure for changing from the terrible (design and price) OEM Ferrari fuse blocks to the much better glass fuse option. The fuse blocks I used were from UAP NAPA and cost $7.99 each. If you are skeptical about the price don't be. This is what a fuse block should cost; not over $200 from Ferrari. So here are the steps (I am sure the blanks can easily be filled in as I shot these pics post install). 1. Comparision of OEM to new fuse block. You will note that the new one is longer. The fuses break off to the desired length but 9 fuses is still too long (it fits but not perfectly. The procedure outlined here is for a perfect install). 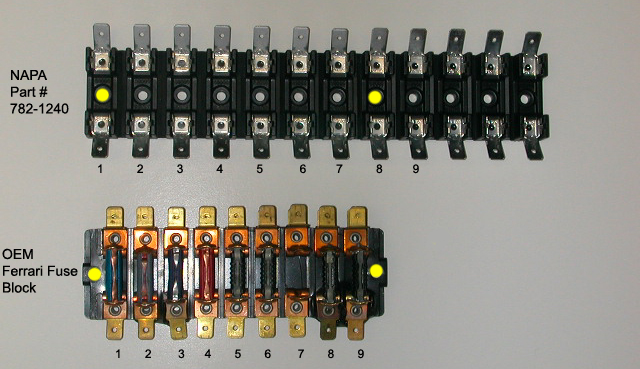 2. The solution is to mount individual fuse holders off the original strip to a piece of aluminum (or other similar stiff material). I mounted mine using 5/32" pop rivets and it is a very firm install. I installed the rivets from the back side because it yields a stiffer assembly. 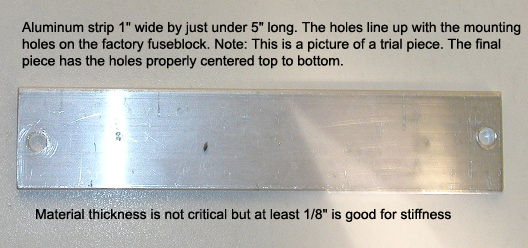 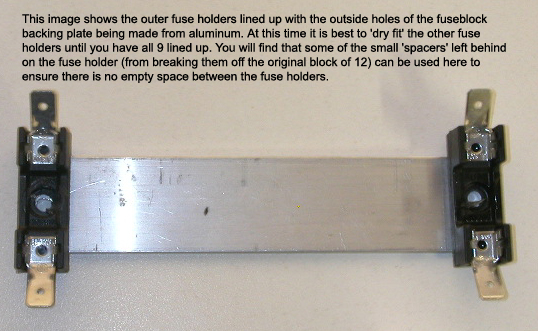 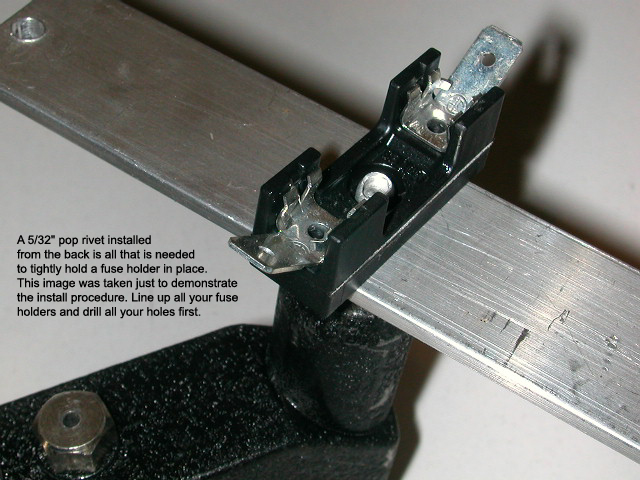 3. You will notice on the OEM fuse block that some of the fuses are banded together on the back side. To replicate this transfer of power just make simple jumper leads using 14 guage cable and insulated shovel connectors.  In order to place 2 connectors on one block you will need a simple splitter. This is what they look like and they are available at an electronics or auto parts store: 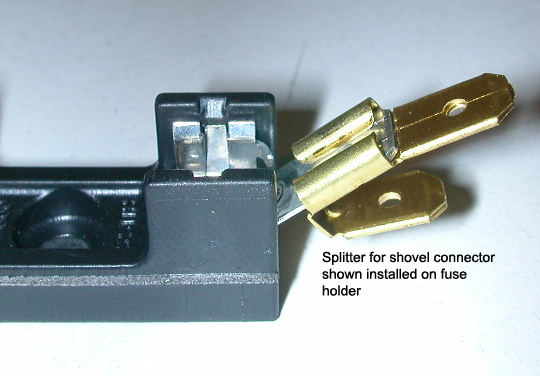 4. Once your entire fuseblock is made all you have to do is label all the cables (pencil on the white plastic works well for this) and transfer the connectors from one fuse block to the other Once you have transferred all the connectors. The fuses can be installed and the install is complete. Note: some of the fuses are 16amp in the OEM configuration. 16amp fuses are not available in glass but a 15amp works perfect with tons of safety margin.  Of course do all of this with the battery disconnected and make sure all of your connections are tight. Total cost: Under $40 Time: 1.5 - 2hours Knowing you saved the KY Jelly for another Ferrari only part: PRICELESS If you attempt to do this good luck and you will never regret making this change. As a final tip, I lined up my old fuseblock covers on a photocopier and copied off a a glove box reference as to the role of each fuse. |