| Author | Message | ||
| Verell Boaen (Verell)
Intermediate Member Username: Verell Post Number: 1308 Registered: 5-2001 |
I could have sworn I posted the following 3 days ago. Must have only previewed it: There are a couple of links that I found very useful. The 308 GTB Register 's TechTip is one of the better water pump rebuild write-ups. The other one is the 'online service manual' at www.expensivecar.com. I had both of them when I did my rebuild. I also ran into some things that they didn't cover: I rebuilt my 308QV's water pump in May, 2000, I now have ~10,000 miles on it (summer daily driver). Got the kit from T. Rutlands for ~$100. Took about 4-5 hours to pull the front of the pump, rebuild it, & reinstall it. I basicly followed these procedures: Carl Jones write-up in the 308GTB register: http://www.r-design.net/308/ Click on English Version Click TechTips on menu to left of page Click on Tech Tip #6 - Water Pump and Matt Boyd's write-up: http://www.expensivecar.com/water.htm A few tips: 0. Two things to watch out for: The pumps used two different bearing sizes, and also 2 different size rubber/ceramic disc seals. I recommend pulling the pump shaft & measuring the seal diameter as well as the bearings before you order the rebuilding kit. (Guess who didn't & had to wait for the right size seal to arrive). The T.Rutlands salesperson tried to talk me out of trying to rebuild the pump "Because almost always the pump failed because the housing was cracked, or you'll crack the housing when installing the bearings." My housing looked good on the car, & I figured I could return the kit if I hadn't opened it & the housing got cracked removing the bearings. 1. Bearing Removal: After removing the impeller, old seal, & the shaft, the bearings can be removed. My bearings were both pretty badly corroded/rusted into place, had to tap them pretty hard to get them to start moving. Slide the cylindrical spacer between inner & outer the bearings a bit to one side, until it's about 50% off-center. Slide a small socket thru the inner race of the inner bearing (the one that was behind the seal) & use the socket/spacer combination to drive out the outer bearing. 2. THIS STEP IS IMPORTANT: I believe that what breaks most housings is someone attempting to drive the inner bearing out over a large corrosion buildup on the inside of the housing. Clean as much corrosion as you can out of the housing before removing the inner bearing. After you've got the outer bearing out, use a ~1" dia brass (preferred) or fine steel wire brush in an electric drill to polish out any corrosion in the space between the inner & outer bearings. Usually there's a surprising amount of crud to be removed. 3.remove the C-clip and conical spring washer that retains the inner bearing & use a socket that just fits on the bearing's inner race to drive the inner bearing out. This may destroy the bearing, but so what. 4. Repeat step 2. This time clean as much corrosion as you can out of the c-clip groove and area where the inner bearing was installed. The bearings are supposed to be a very snug fit to ensure the outer race can't rotate. You just want to clean things up, but not remove enough aluminum so that the bearings will rotate in the housing. 5 Also clean out the 2 holes that drain the bearing area. Both were plugged up. 6. Install the inner bearing, conical washer & circlip: Lube the bearings with some radio shack teflon lube, or white lithium grease. Install & seat the inner bearing 1st, use a large socket to press on the outer race so you don't damage the bearing. The bearing will slide right in, At most It'll just need a couple of taps w/a plastic hammer to seat it. The large, narrow conical washer between the circlip & the rear bearing is angled to act as a spring, presumably to tightly retain the bearing. My old conical washer was so badly rusted that I couldn't tell which way it was facing. With help from FerrariList members I determined that the conical washer's inside edge presses against the rear bearing's outerrace, and the washer's outside edge presses against the circlip. Otherwise, the inner edge may extend inside the circlip where the clip's width narrows, thus reducing the spring tension. 6.Insert the bearing-bearing spacer & outer bearing. 7.Sealing the seals: Use and RTV to seal the seal ring into place in the housing. (Permatex makes a grey RTV recommended for water pump applications, but any of the 'Super Blue', Super Black', etc. RTVs should be OK). Be very careful to NOT get any RTV (or oil, grease, etc.)on the sliding ceramic seal or the mating part. The seal depends on the ceramic surfaces being fully wetted by coolant. Surface tension does the actual sealing. Anything that repels water on the ceramic surface can cause the seal to leak. 8. Install the seal on the water pump shaft, along with the impeller, bend the retaining tab over the impeller nut after tightening the nut. 9. Pre-Lube the rotating joint between the ceramic seal & mating part with coolant then re-install the water pump shaft thru the housing half of the seal. 10. Apply a thin film of RTV to the inner water pump case, & install the gasket. Then put another film on the gasket & install the water pump housing. Don't put RTV on the pump housing, you'll just scrape it off when you try to fit the pump over the studs(ask me how I know)... Some people like to use Hylomar for the outside of the gasket. Since Hylomar never sets up, if ever you have to pull the pump apart again, the water pump will cleanly separate from the gasket which will stay on the pump case. In my case since the gasket stayed on the inside of the pump in one piece, I just smeared a thin film of the RTV on the gasket as a dressing. Oh, yes, while you've got things apart, you may want to polish the housing & spray it with 3-4 coats of clear coat (I use rust-oleum clear). Also clean up the pulley & paint it. Your pump will look brand new!!! Suggestively, Verell Boaen | ||
| Robert W. Garven Jr. (Robertgarven)
Member Username: Robertgarven Post Number: 347 Registered: 2-2002 |
Also if you are taking the water pump housing off, mine has studs also, I needed to double nut the studs and remove them. Behind the housing is the o-ring. As to grinding the cam covers many have done it but there is an adjacent thread on a rock on the belts, I left mine alone. You may want to make sure you have a later pump, if not upgrade to a newer, places like TR, GT car parts have rebuilt ones. You have to grind down some of the newer water pump to fit on the older pulley although I doubt you will have a problem with your car. 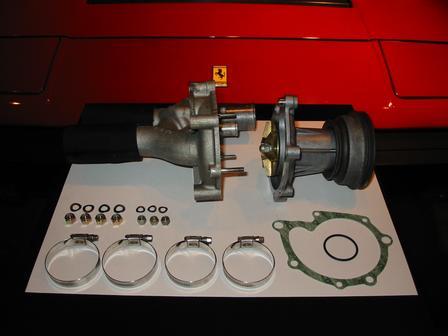 | ||
| Jay S. Morris (J_saber)
Junior Member Username: J_saber Post Number: 106 Registered: 12-2002 |
Thanks for your input Sean. I went to that site first and thought, 'No problem, a peice of cake'. It ends up that the earlier 2 valve version of the 308 powerplant isn't as user friendly. I wish I had access to a digital camera so that I could post the process of the removal and installation. Hey, that's a thought. Maybe I'll hint for one in these coming holidays! | ||
| Sean F (Agracer)
Member Username: Agracer Post Number: 414 Registered: 2-2003 |
Their is a write up on www.expensivecar.com to do the WP, Belts, Clutch, etc. | ||
| Philip Airey (Pma1010)
Member Username: Pma1010 Post Number: 484 Registered: 7-2002 |
Jay I've just done mine on my carb'd 308. My pump has studs (rather than bolts affixing the pump on the later models) and the "in the way" cam covers. The job is a bit of a PITA but reasonably manageable by a weekend mechanic. Check the shaft condition - mine was pitted and required replacement. As you know, anti-freeze is sweet (liked by pets and young children) but harmful. Good luck | ||
| Jay S. Morris (J_saber)
Junior Member Username: J_saber Post Number: 105 Registered: 12-2002 |
Yeah, that was what I was afraid of. Oh, well. All in the glory... Thanks guys. I should have some fun in the days ahead. I agree Steve, I might as well change all the belts while Im'm at it! Thanks again guys, you're always there. | ||
| Tom Bakowsky (Tbakowsky)
Member Username: Tbakowsky Post Number: 737 Registered: 9-2002 |
Ummm...You should beable to use an open end wrench to undo those bolts. But if they are really tight you may have to remove the front t-belt cover. If your car has a/c then you will have to remove the compressor(pain in the butt) and mounting bracket. All drive belts will have to be removed as well as the a/c compressor tensioner pully and bracket. Somtimes you can just side the cover back enough to allow access to the bolts with out fully removing the t-belt cover. The reason for this is so you don't have to undo the coolant pipe to fully remove the cover. HTH. | ||
| Steve (Steve)
Member Username: Steve Post Number: 469 Registered: 2-2001 |
Jay you need to remove the cam belt cover. The only other option you have is to grind the area on the cam belt cover that has the interference.I would consider how many miles/years you have on the cam belts and if better then 20k miles or 4 years you might as well do the whole job and change the belts. Late cars had material removed on cam belt covers that lets you remove the WP without taking off the covers. | ||
| Jay S. Morris (J_saber)
Junior Member Username: J_saber Post Number: 104 Registered: 12-2002 |
Really, what I am wondering about is the bolts. the cam belt cover for the front bank is making it quite hard to access my last bolt. My question is really about this cover. Do I need to remove it in order to take the water pump off. And if so, what would be the correct order for the procedure, as there are several things connected to this cover. | ||
| Tom Bakowsky (Tbakowsky)
Member Username: Tbakowsky Post Number: 736 Registered: 9-2002 |
Dumb question...but did you undo to 2 large hoses at the rear of the water pump that go under the intake plenum? If so the hoses could be stuck to the pump hosing and might require a little bit of wiggling and pushing on the hoses to get it off. You have obviosly undone the 4 bolts,and moved the bracket out of the way that holds the aux air valve. I thnk it's just stuck on the 2 rear hoses. | ||
| Jay S. Morris (J_saber)
Junior Member Username: J_saber Post Number: 103 Registered: 12-2002 |
I got a pretty large problem on my hands. I need to rebuild the water pump on my 2v Mondial. Easy right? Hmmm, I just can't seem to get the darn thing off! Can any of you guys walk me through it. I looked at the post up for the QV but it turns out that it's alittle different. |