| Author | Message | ||
| Andreas Forrer (Tifosi12)
Advanced Member Username: Tifosi12 Post Number: 2647 Registered: 10-2002 |
John, pretty impressive description of changes you made. Cool! You got a point about the dust. I think I'll be more careful going forward picking them up only by the wheels or under the roof. Many of my cars have relocated with me from Europe, which you can imagine doesn't help the details like mirrors etc. Also my F1 cabinet collapsed twice on me. So I'm getting a bit more relaxed about missing mirrors etc. Just part of life. If you like you can get the 288 GTO on ebay. German ebay has most of these cars for little money. I just recently bought a F40 just because I needed a racing seat for a F50 GT project. As you can imagine I have meanwhile a collection of 'body parts' in a box. Kitbashing! | ||
| John Leaman (365boy)
New member Username: 365boy Post Number: 20 Registered: 10-2003 |
Thanks Andreas. Can't wait to see it.... I'm afraid my tarting-up-Burago days are long over, as I don't have the patience any more. Thanks goodness that Kyosho, AutoArt, Exoto etc now do it all for us. I last tinkered around with the Burago car about 12 years ago. The Maisto one perhaps seven years ago. (Incidentally, have you ever seen that Maisto 250 GTO '64..? I think it's pretty rare, so I was lucky to find it). Anyway, here are the changes I made on the Burago car: - Blanked off the side air vent holes front and rear with matt paper and painted the inner surfaces with matt black paint. You never see inside them on the real car... - Painted the side window surrounds in silver. The windscreen surround and rear window surround were already in chrome, so they were left. - Disassembled the wire wheels and painted the inner set of spokes a darker silver, to give more of a 3D impression. The outer spokes were also painted normal silver, as the real ones are not quite as chromed as the model's. The spinners are chromed, however, so they were left - Added a tiny piece of circular silver foil to the centre of the wheel spinners (the real ones don't have the hole in the middle that the model's do). - Added a silver key hole to the fuel filler cap, and painted the trunk handle silver - Added orange and silver paint to the rear taillight clusters, as necessary - Blacked in the inside of the exhausts - Added a (single) wiper blade. The original model didn't have one ! - Painted the side jacking point covers silver - Painted the entire inner surfaces (originally grey) in matt black - so eg now you can't see behind the front grill. Much more realistic - Painted the headlight cover surrounds in silver (very fiddly !) - Painted the surface area underneath the headlight covers in body colour red - Added circular side indicators in orange with silver surrounds - Painted most of the interior in matt black or left it in matt grey. Steering wheel rim was painted a gold/brown mix, to simulate wood grain, and I added a prancing horse logo to the centre boss. - Painted engine cam covers in matt black with 'Ferrari' picked out in silver. - Blacked out the inside of the cylinder trumpets - Tidied up the Scuderia side shields (cut off the ragged clear surrounds with a sharp knife, and realigned them). - Painted the exhaust piping matt black along their full length, except the pipes themselves which were left chromed - Blacked in the shut line on the small flap just below the hood (and ditto the one behind the passenger's door) Did pretty much the same on the Maisto car - except I mistakenly did that interior in gloss black, so it's too shiny on the dash. I also had to adjust the ride height on the Maisto car, as it has springs which allow the car to sit too low at the rear. Very good example of a completely pointless bit of detail - especially on such a relatively cheap model. PS I wasn't kidding about the dust. After a while (in my house anyway..) the cars do gather dust and do look much less artificially shiny. The only problem of course is that it looks awful if you pick them up and have finger prints on them - so I tend to keep them in the same spot for 6 months, then give them a thorough clean, and then put them somewhere else to start dusting up again..! Mad, I know. I have other Burago Ferraris - among them the Testarossa and F40. To be honest I don't like these as much as the older cars (although I have worked on them), so they have been sitting ignored for several years now. I got them out to take some pictures for you, and as you can see the dusting process has got a little out of hand.... I also had the 288 GTO, which I worked on, but unfortunately the cat knocked it off a high ledge. A somewhat 'Italian Job' moment... It was similar to the F40 in some ways; it needed the central strip picking out in black - which is quite fiddy but makes the model look so much better when it's done. The most difficult parts of the 288, however, are the front and rear slats. I find the best thing is to paint them quite crudely over with watery matt black paint, and then - before it dries - rub away the excess with a finger or cloth. then you're left with paint sitting in the bottom of the grooves (looking like the bodywork is perforated, as on the real car), but not on the upper body surface. It's a high-risk strategy, but if it works it looks really good. Anyway, I hope that helps. Your 288 interior is a lot more detailed than mine was, so I'm sure you can make a great job of the exterior too. Good luck and best regards, John 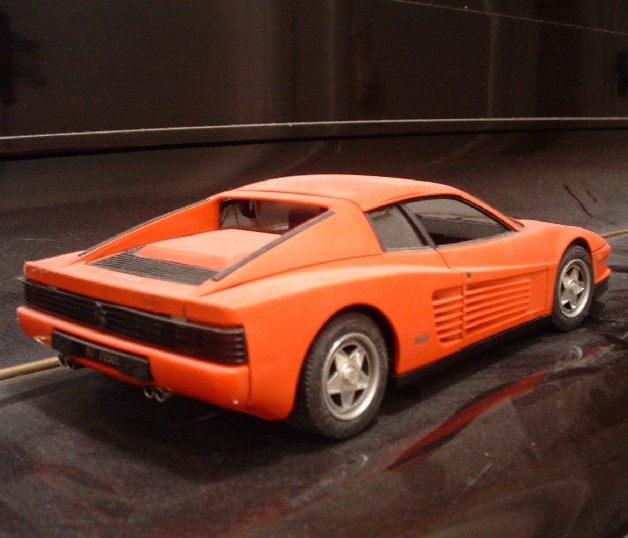 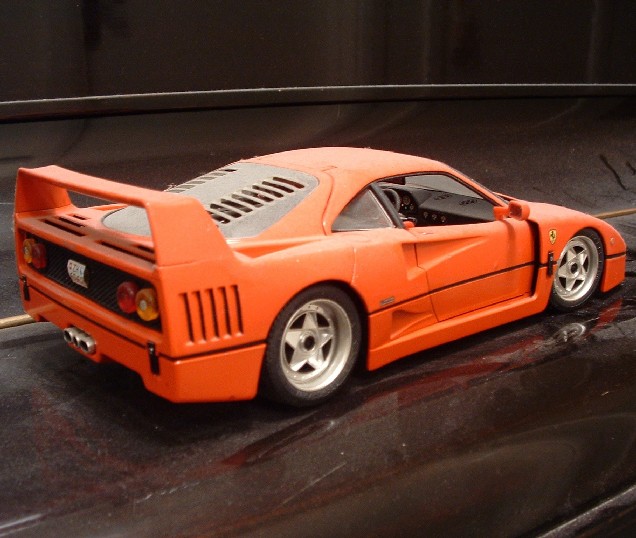 | ||
| Andreas Forrer (Tifosi12)
Advanced Member Username: Tifosi12 Post Number: 2635 Registered: 10-2002 |
John they look great, can you elaborate on the changes you made please? PS: Coming soon: The improved 308 QV 1/18 scale. | ||
| John Leaman (365boy)
New member Username: 365boy Post Number: 19 Registered: 10-2003 |
Goddam computers. Try again... 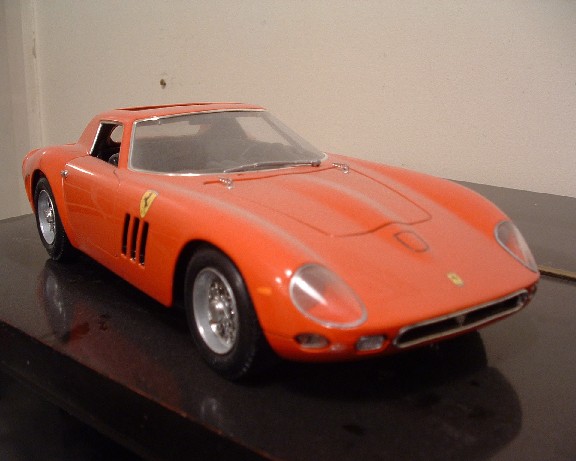 | ||
| John Leaman (365boy)
New member Username: 365boy Post Number: 18 Registered: 10-2003 |
I've been through a similar process with the Burago 250 GTO (and Maisto '64 GTO). Lots of work, mainly on the exterior of each. Add a thin coating of household dust, and they're beginning to look like the real thing... 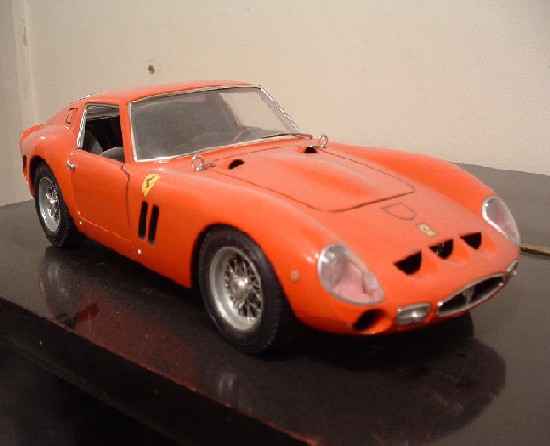 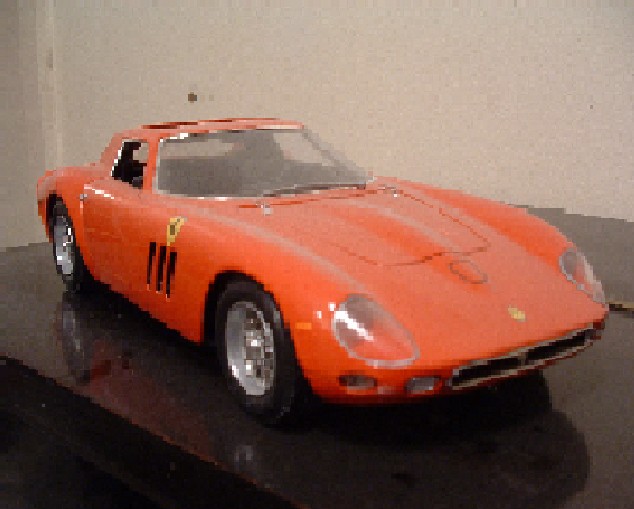 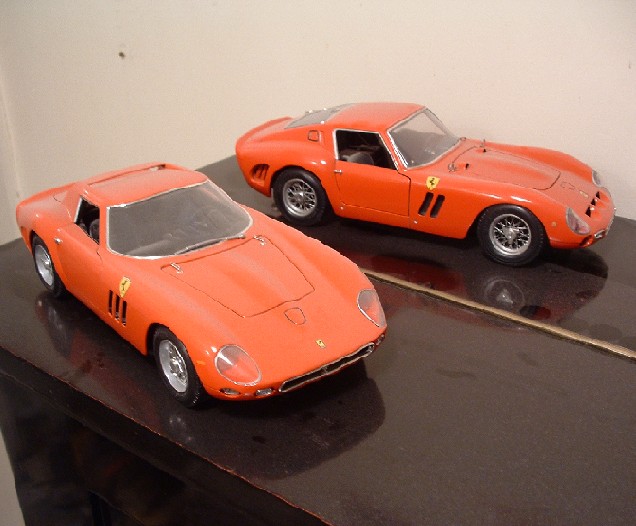 | ||
| Andreas Forrer (Tifosi12)
Intermediate Member Username: Tifosi12 Post Number: 1242 Registered: 10-2002 |
"Not to be picky but...LOL...the valve covers are red in the center where the plug wires go in, the rest is aluminum as are the hoses that conect the plumbing to the air boxes." Jay, I checked your source (V8 Original) and have to say, the engine picture there looks similar to the one I used in Forza. And quite frankly that looks like my GTO engine. I don't get your point in other words. | ||
| Scott85 (Scott85)
Junior Member Username: Scott85 Post Number: 86 Registered: 12-2000 |
You can also do a wheel swap from the Burago F40 for a more accurate look. It looks better too. | ||
| Andreas Forrer (Tifosi12)
Intermediate Member Username: Tifosi12 Post Number: 1228 Registered: 10-2002 |
Jay, I used flat black for the dashboard and carpets and a semi gloss (or satin) for the seats and the door panels. Your car is getting there, but don't forget the A and B colum and the wheels (chrome hub, aluminum spokes). I like the smaller shields on your model, more realistic. | ||
| Jay Grande (Jay)
Intermediate Member Username: Jay Post Number: 1383 Registered: 10-2001 |
I was using Original Ferrari V8 as my source material. I think that I need to buy some Satin black to make the interior look more like leather. It looks real shiney because of the flash but it is more of a semi-gloss. 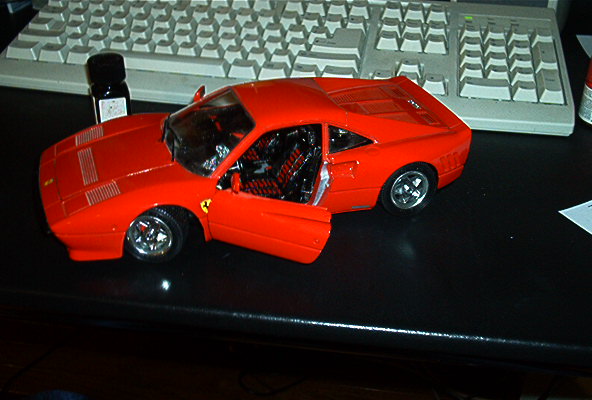 | ||
| Andreas Forrer (Tifosi12)
Intermediate Member Username: Tifosi12 Post Number: 1224 Registered: 10-2002 |
Ken, thanks. Jay, glad I got you going. Actually I based my mods on the Forza June 99 issue, the engine was made to look like the one on page 76 where the red is just like in my model (ok, I missed a red ring going into the coolers). I wouldn't be surprised if your picture is different. I have seen a surprising variety in 288 in general, like e.g. the rear end has been different everytime I look. I used a flat red for the Daytona seat stripes and the two parts in the dash. Please post your pics eventually. | ||
| Jay Grande (Jay)
Intermediate Member Username: Jay Post Number: 1381 Registered: 10-2001 |
Looking at a real GTO engine I noticed some things. Not to be picky but...LOL...the valve covers are red in the center where the plug wires go in, the rest is aluminum as are the hoses that conect the plumbing to the air boxes. BTW what color red are you using for the chairs and flares seats? | ||
| Jay Grande (Jay)
Intermediate Member Username: Jay Post Number: 1379 Registered: 10-2001 |
My screwdriver is out! I'm taking my Bburago apart! I've always hated Bburago interiors also. | ||
| Dr. Ken Lee (Kenster888)
Junior Member Username: Kenster888 Post Number: 88 Registered: 4-2003 |
Andreas, I also have the old version and is one of my favorites. I like what you did with it. Bravo! | ||
| Andreas Forrer (Tifosi12)
Intermediate Member Username: Tifosi12 Post Number: 1206 Registered: 10-2002 |
Scott, thanks for that, didn't know about the HW version. Looks like basically I got that now out of my Bburago with my mods. The HW still has the better (more accurate) rims, but I got the Daytona style seats (and dashboard trim). | ||
| Scott85 (Scott85)
Junior Member Username: Scott85 Post Number: 83 Registered: 12-2000 |
You should get the HW/Mattel version of the 288 GTO, its 10X better . http://www.geocities.com/custom118/288.html | ||
| Andreas Forrer (Tifosi12)
Intermediate Member Username: Tifosi12 Post Number: 1201 Registered: 10-2002 |
Paul, actually the shields came with the model. Bare in mind, that I bought my model about 15 years ago. Actually I don't like the shields as they are too big, but replicating them is difficult, so I let it slide. | ||
| Paul Bianco (Paulie_b)
Member Username: Paulie_b Post Number: 262 Registered: 1-2003 |
Andreas, where did you get the shields for the model? Is that standard with the model. I have the same and cannot remember if it comes with the shields. | ||
| Andreas Forrer (Tifosi12)
Intermediate Member Username: Tifosi12 Post Number: 1200 Registered: 10-2002 |
For years I've been annoyed by the 1/18 Bburago GTO model. Beautiful on the outside, all wrong on the inside. So finally I took a screwdriver, loosed the 3 screws and took the model apart. Unlike today's models it doesn't use any glue, so disassembly (and assembly) is easy and you can paint the parts the way they're supposed to look: 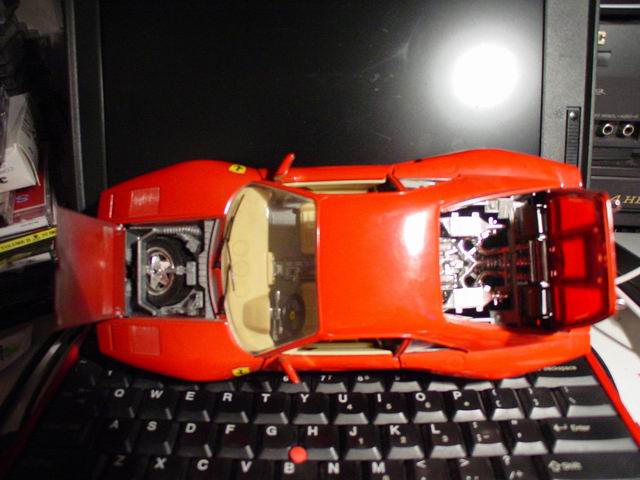 The BEFORE shot. 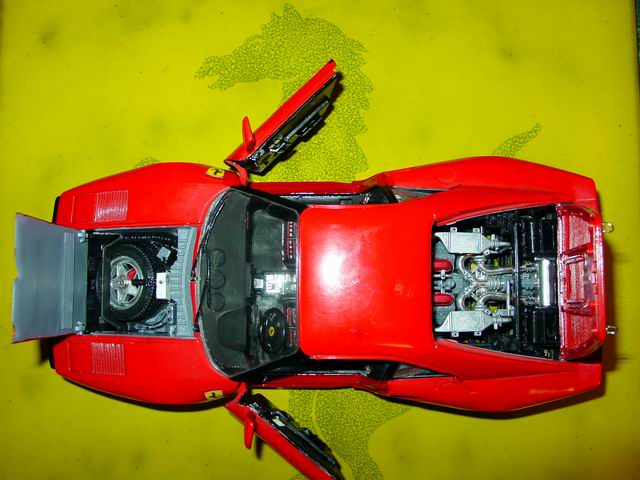 The AFTER shot. 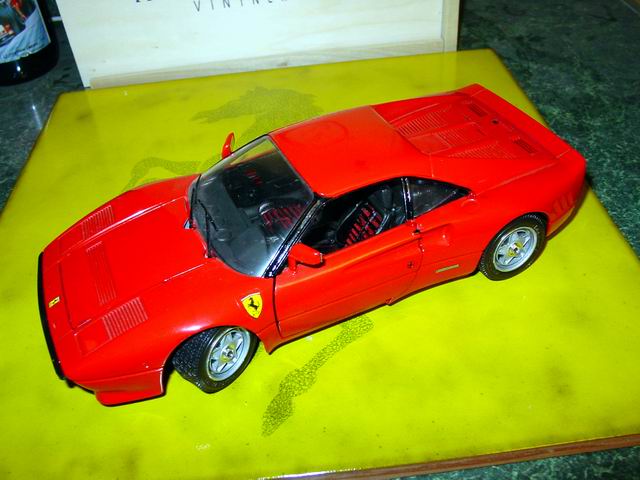 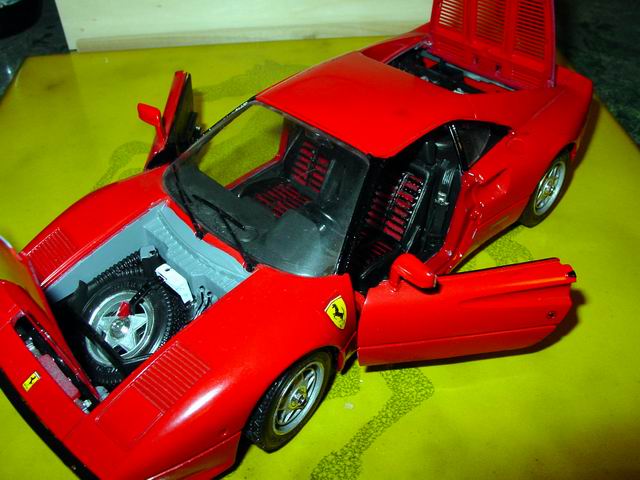 Not shown on the pictures I also painted the front lights in the bumper and repainted the rear lights (wrong or no color scheme). Redid the tires (including the emergency spare, wrong size though), A and B colum, the entire interior and the engine (was all chrome, yikes!). |