| Author | Message | ||
| Jeff B. (Miltonian)
Junior Member Username: Miltonian Post Number: 72 Registered: 12-2002 |
Hi, Justin; To make a short story long... Those are chromed wheels, they were like that when I bought the car three years ago, in fact they were out being rechromed just before I bought it. I have heard of "factory chrome wheels" for 348's, but I don't know if such a thing really exists. Were they chromed from the factory? Dunno. I never would have wanted chrome wheels before I got the car, but these have grown on me. I think they look fine, at least on a white car like mine. And the chrome is holding up extremely well. When I was working for Acura, we used to send out wheels for new cars to be chromed, and had to discontinue, as they never seemed to come out well and last well. I suppose it's 90% preparation and 10% application. Generally speaking, I think the "purists" out there hate to see chrome wheels on Ferraris unless they were original equipment. | ||
| Justin Randall Kenyon (Kenyon)
Junior Member Username: Kenyon Post Number: 67 Registered: 10-2002 |
Jeff, Sorry to butt in, are your wheels painted or chromed in you profile ? I have the standard wheels and wish to make them look like yours. Is this possible. ?? Please responsed. Thanks | ||
| Rob Schermerhorn (Rexrcr)
Junior Member Username: Rexrcr Post Number: 145 Registered: 11-2002 |
Jeff, looks great, strong work!! I like your resourcefulness with the tools. Found my notes from '96: 230 grams of grease estimated to be equivalent to ~260 milliliters. Did this conversion to facilitate use of the syringe that comes with the grease being calibrated in ml. Right or wrong, that's how I did these deallies. | ||
| Jeff B. (Miltonian)
Junior Member Username: Miltonian Post Number: 70 Registered: 12-2002 |
JRV: I made the tool out of a slightly modified "off the shelf" 4-pin socket welded onto a 3/4" drive impact socket. It was only just BARELY adequate to do the job and I consider it to be trashed at this point. Next time I would buy a much larger impact socket and machine it down to size. Not that hard to do. My friends at Pete Lovely Racing went through a whole box of similar custom-made sockets to see if they had one that would fit - close, but not quite. I didn't replace the seals because: 1) I had an obvious source of leakage from the loose filler plug. 2) There was no indication that transaxle lube was leaking (other than discoloration of the flywheel grease - normal after extended use?). 3) I wasn't charging anyone for a guaranteed repair, just "digging into it". 4) If it goes bad again, I'll take it apart again and do the job over, this time replacing the seals. Not a big deal. I expect the repair to last for at least a couple of years. Now that the mess is cleaned up, I'll know right away if new leaks develop. | ||
| JRV (Jrvall)
Member Username: Jrvall Post Number: 631 Registered: 11-2002 |
Jeff, nice photo, clean work. How about some pics of the tool you made and the seals. TIA | ||
| Greg Rodgers (Joechristmas)
Member Username: Joechristmas Post Number: 607 Registered: 3-2001 |
Great pic. Thanks. | ||
| Jeff Edison (Euro308guy)
Junior Member Username: Euro308guy Post Number: 165 Registered: 7-2002 |
good post | ||
| Jeff B. (Miltonian)
Junior Member Username: Miltonian Post Number: 67 Registered: 12-2002 |
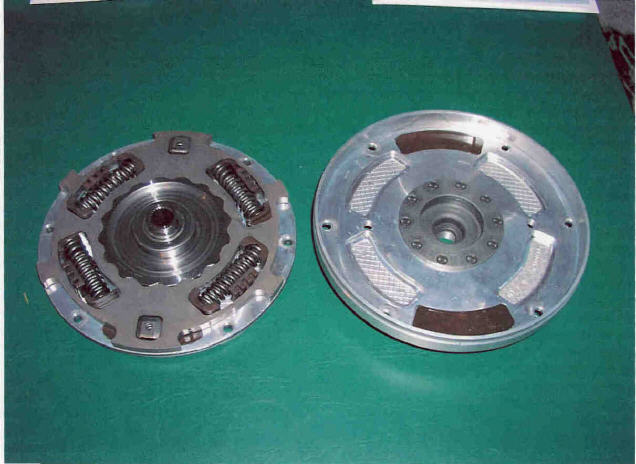
I thought some of you 348 nuts might like to see what the inside of your "Voith bi-mass flywheel" looks like, since there are no illustrations in the Workshop Manual or in the Parts Book. There is an inner and an outer flywheel housing, cast and machined to locate the various parts. There is a central disc with cutouts holding the four springs and their shoes, and two spring-loaded "sliders" riding against their pads. The splined central hub takes drive from the input shaft, and the clutch plate is bolted directly to the flywheel housing. When the flywheel is filled with the proper quantity of the special grease (Kluber GLK 1301 - it looks just like Crisco shortening), it acts to dampen vibration for smooooth operation. If the grease is leaking or diluted, the internal parts rattle about, particularly on engine startup and shutdown. In my case, the grease was being slung out around one of the filler plugs that had backed out about two turns, making a huge mess inside the clutch housing, but apparently causing no damage. Once the flywheel had been cleaned and refilled, it seems to be working like a charm - no more noise! I had to make the special tool to remove the ring nut securing the flywheel to the clutch cover, and use a press to push it all apart, but the rest of the job is "nuts and bolts". Thanks to Billybob and Rex for advice and support!  |