| Author | Message | ||
| Verell Boaen (Verell)
Member Username: Verell Post Number: 577 Registered: 5-2001 |
AutoZone Air Filter part #: I pulled my air box to scan the cover. The air filter is stamped 'A727'. Also, It's a much better fit than I remembered. In addition to removing about 3" of the foam on the back, I just had to trim some excess molding flash off of one corner and along one side. | ||
| Verell Boaen (Verell)
Member Username: Verell Post Number: 548 Registered: 5-2001 |
ANY OTHER Unobtainium Supply PRODUCT SUGGESTIONS? Petersetlak reminded me that I should alway ask for feedback & additional product ideas. Please feel free to post them to this thread! BTW, here's an Injected 3x8 Air Filter tip: AutoZone sells an air filter that works fine in the fuel injected 308/328s with only trivial modification. 3 minuites with a box cutter trims it to fit. The rubber seal is slightly less than 1/8" too wide, so you trim about 1/16" off of each side. Also, the filter has about a 1/2" thick foam pad on the bottom of the filter. You have to trim about 4" of the foam off of one end of the filter so it will fit the air box end where the bottom tapers up. I found it by taking my old filter into AutoZone & opening boxes that looked about the right size. It was in the grey-colored box. I can't rember the brand name, started with a B tho. Anyway, it's moot as the company has been changed their brand name to STP & gone to STP's red/white/blue lable color scheme since then. I'll see if I can find the part number for you. Think it cost me $20, maybe less! With the extra foam filtering, it may actually be a better filter than the factory one! | ||
| Verell Boaen (Verell)
Member Username: Verell Post Number: 534 Registered: 5-2001 |
Greg, Do I understand you right, you've broken the outer twist knob part of the headlight stalk? Well, there's bad & good news: It'll probably be at least 6 mo to a year before I can make a complete headlight stalk. Reproducing the headlamp stalk requires making the spring brass switch contacts that are under the twist knob, I don't have sheet metal stamping capabilities yet. I need to build up product volume that will subsidise the cost of making the stamping dies. BTW, I haven't located a source for the small springs & steel balls that form the detents for the various places in the column switch. Anyone know of a source? However, my suspicion is that the actual internal switch mechanism of the stalk doesn't fail. If anyone has had other experience, please let me know.) GOOD NEWS: I should be able to supply the twist knob within a month or so. Somewhere I got the idea that the switch end of the headlight stalk is internally metal reinforced. Can anyone confirm or refute this? Making a mold that will let me cast a new switch end is just a matter of time unless I have to work up a metal reinforcement. Until I can reproduce the switch mechanism, I'm considering providing a headlight stalk refurbishing survice. A correction to my earlier post. I only have 3 MINUITES (not sec.) to get the material into the mold, the bubbles out & the mold under pressure while the casting cures. | ||
| Greg Owens (Owens84qv)
Member Username: Owens84qv Post Number: 649 Registered: 10-2001 |
Verell, Do you have any plans to reproduce the headlamp stalk? I know this is one of the may part made from unobtanium. The plastic "end cap" has cracked and I've put mine back together with super glue Just curious. | ||
| Verell Boaen (Verell)
Member Username: Verell Post Number: 533 Registered: 5-2001 |
Re: polyurethane resin I'm using a couple of different kinds with different properties: - Alumilite Casting resin available from many hobby shops & from www.alumilite.com. Several other companies such as PolyTek make similar casting material. - Devcon Flexane 80 whose properties I can control with their Flex-Add flexabilizer: http://www.devcon.com/devconcatsolution.cfm?catid=14 re: Yellow Mold material It's really an off-white RTV. A lot of the work went into developing both the mold-making & casting process. This stuff sounds simple to work with, but the devil is in the details. Took me about 3 months to get a process worked out to where I can get consistently reproducable results. Some of the things I delt with are: The mold material has to have a vacuum pulled on it or it will have tiny bubbles that make it tear easily & collapse under casting pressure. If you keep it under vacuum too long, it won't cure... It takes hours to cure, & before it cures it leaks thru crevices that won't leak water... If you don't pour it just right, you'll trap an air bubble in the master part & either have to redo the mold, or else rework the castings to make up for the bubble in the mold. Sorting out a mold release material that still leaves an acceptably polished finish. Figuring out where air bubbles will form in the casting, forming vent holes in the mold to get rid of them, & where to inject the material into the mold so as to minimize them. Mold & casting material mixing ratios are critical. I have to control critical material ratios, mold temperature, pre-mix temp. of the casting material, you only & have 3 seconds to mix the material, inject it into the mold, & get it under air at 40psi before it starts setting up. It's cured under 40 psi. Then there was the search for a chrome plating vendor who's willing to do plastic in small quantities at a somewhat affordable price. Then dealing with some material incompatibilities between the plating process & my casting process... The list goes on. It was a lot of 3 steps fwd & sliding back 2. Bottom line is it took lots of R&D to get to this point & there's still a lot of hand labor/piece. | ||
| Jeff Howe (Ferrari_uk)
Junior Member Username: Ferrari_uk Post Number: 89 Registered: 12-2002 |
Hia. Have been reading this thread with interest. Out of curiosity I've had a look at these various switches. We currently have in stock the following, all Genuine parts: 308GT4 Defroster lever....40072308....�29.85....about$48.68 Heater lever.......40327504....�39.70....about$64.74 Choke lever.......40113805....�26.30....about$42.89 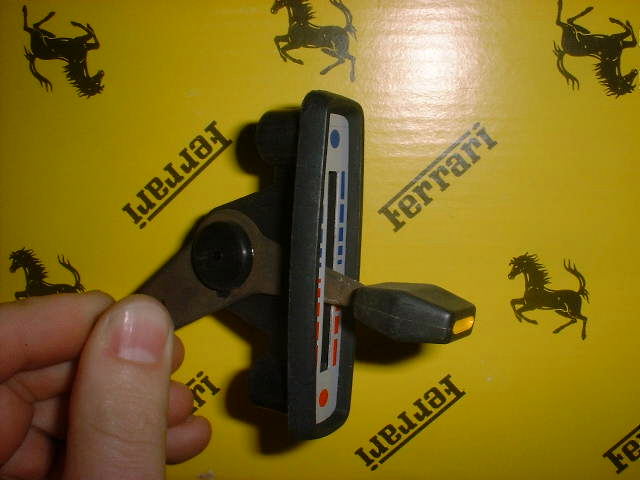 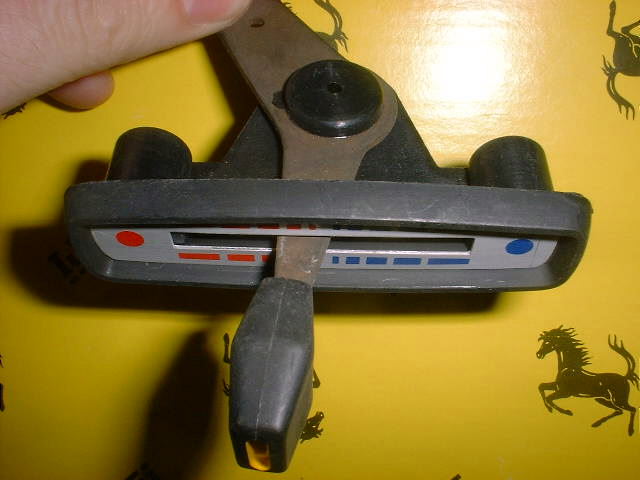 Also the later 308 shiny heater lever, 60548200, �22.00........about $35.87 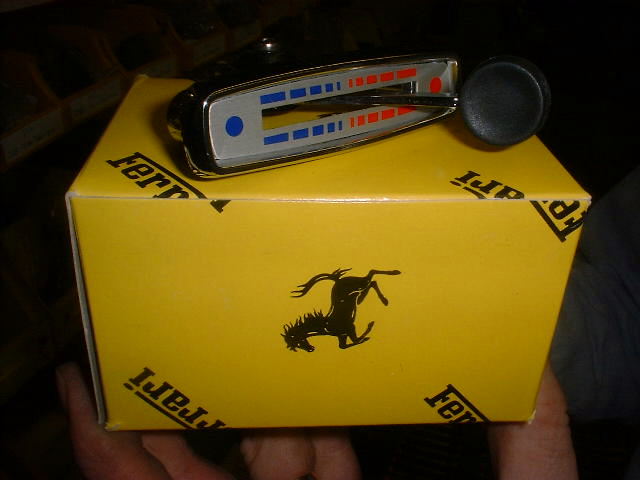 Hope this is all useful stuff. Regards. | ||
| billy bob (Fatbillybob)
Junior Member Username: Fatbillybob Post Number: 201 Registered: 8-2002 |
very cool! what is the yellow plastic mold material made from? | ||
| Simon Campbell (Simonc)
Junior Member Username: Simonc Post Number: 72 Registered: 2-2002 |
Just to say Verell has been working away to reproduce these bezels since late last year and is doing a great job. He has sent me some prototypes that were great but the initial finish wasn't quite right. He has now found a chrome plating company that he is happy with and my bezels are on their way to me. I will report back on the finished product as soon as I receive it next week. Simon Campbell | ||
| John_Miles (John_miles)
New member Username: John_miles Post Number: 31 Registered: 7-2001 |
Holy cow. Nice work, Verell! | ||
| JohnR. (Rivee)
Junior Member Username: Rivee Post Number: 142 Registered: 1-2002 |
Verell, nice work!! You must be a man with a lot of patience and determination. I am the same way in many things, but you have done one hell of a job with this. BTW where did you get the polyurethane resin? | ||
| Verell Boaen (Verell)
Member Username: Verell Post Number: 530 Registered: 5-2001 |
Forgot I'd made these pix. Wiper Stalk switch end: 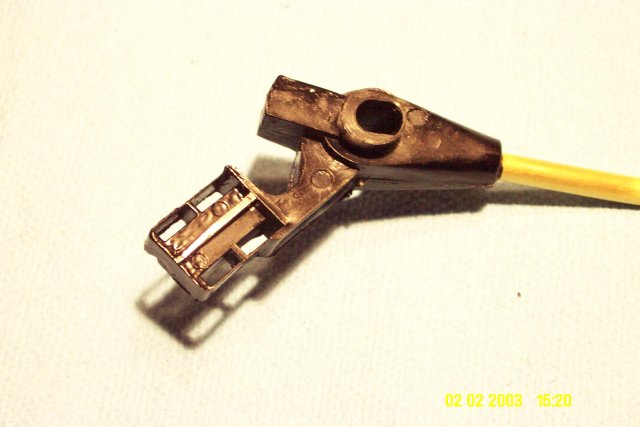 Turn Signal Switch end: 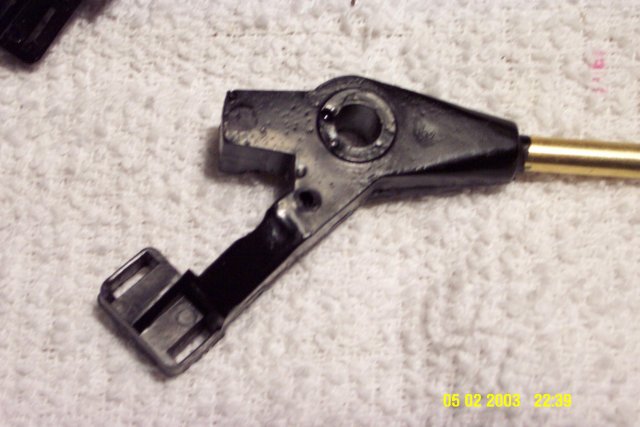 It's got a couple of bubbles because I hadn't figured out where I needed to put vent holes in the mold yet. | ||
| Verell Boaen (Verell)
Member Username: Verell Post Number: 527 Registered: 5-2001 |
FIRST SHIPMENT OF CHROME LEVER BEZELS!!! ALSO FIRST COLUMN SWITCH STALKS MADE!! I took the following photo of the first production shipment of the 400/308 chrome lever bezels along with a pair of the 308GT4 Black Lever bezels just before I boxed them up. They're going out 1st thing tomorrow AM to Simon Campbell who has been patiently waiting for them since I started this endevor last fall! 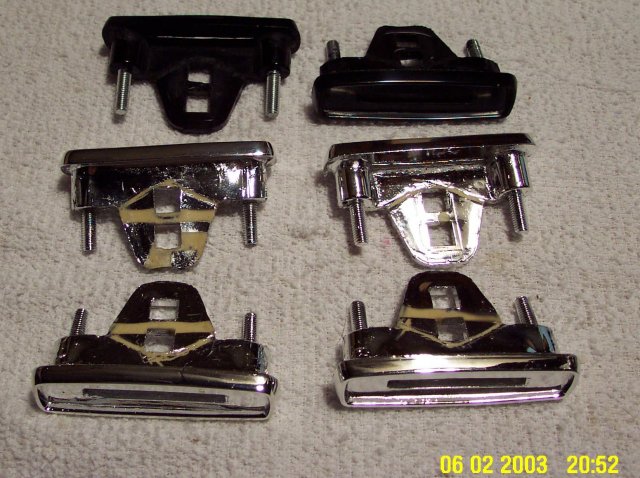 A photo of the 3-piece mold with the steel reinforcing wire & the studs in place just prior to assembling the mold & injecting the polyurethane to make the part: 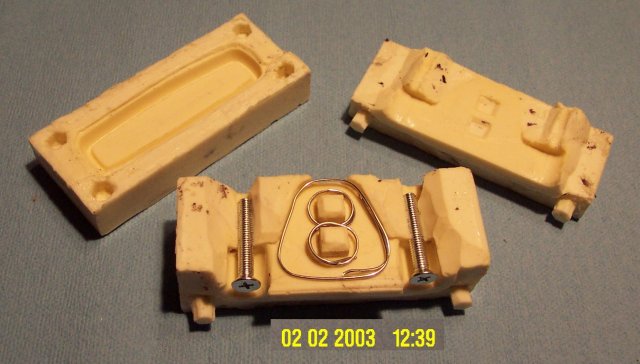 These bezels are a lot stronger than the original ones, & many of the acute angles where cracks started have been eliminated. Even when I tried to destroy one, the steel wire held it together after I managed to crack the plastic! A close-up of the black lever bezel fresh out of the mold & after the molding flash is trimmed away: 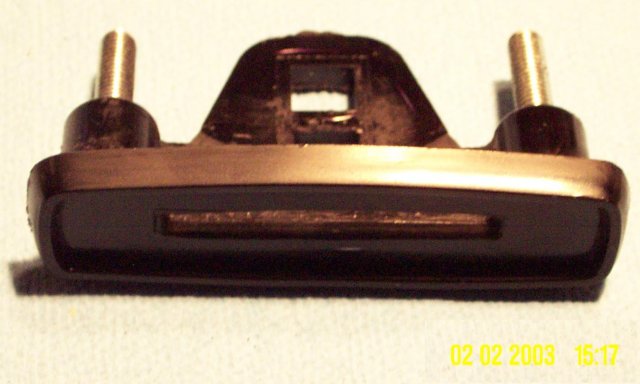 Yes, you can buy them at last! Sodacoms has received a couple of the black lever bezels & may not have sold them yet. Dave also has ordered some chrome bezels that were supposed to ship out of this batch. Unfortunately the plating was flawed & they're on their way back to be re-chromed. PRICING: Part # 0001-US BEZEL, LEVER BLACK: $60 Part # 0002-US BEZEL, LEVER BLACK: $65 COLUMN SWITCH STALKS: 1st ones made!! I now have molds for the wiper & turn signal stalks for the column switch. I've made 1 of each, but haven't had time to mold the knob on the turn signal stalk Here's a photo: 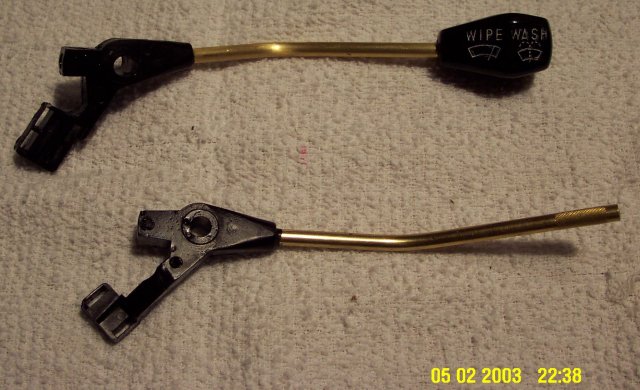 I used brass rod for these 1st units because I had it on hand. You can see how I've spiral knurled the rod ends so the plastic will have both a mechanical grip as well as a chemical bond to it. I haven't selected the final rod material yet. If I can knurl it, I may use stainless steel, otherwise I'll probably use aluminum. There will be two rod colors: clear coated metal for the older cars, & satin black lacquer for the 3x8s. Here's a close up of the wiper stalk knob so you can see the lettering detail. The very small scratches around the figures are exactly duplicated from the original knob. The mold picks up detail down to the coarse molecular level! I just couldn't remove them with out risking damaging the lettering itself. They aren't visable unless you look really close with a lens tho.  I haven't set a price yet, but they're a lot more work than the lever bezels. Each of the molds & the fixture to hold the rod in exact alignment while the plastic cures took me a couple of days to make! | ||
| Anonymous |
poker casino poker 671 |