| Author | Message | ||
| Eric Eiland (Eric308gtsiqv)
Member Username: Eric308gtsiqv Post Number: 687 Registered: 11-2001 |
LOL, Frank  | ||
| Frank Parker (Parkerfe)
Intermediate Member Username: Parkerfe Post Number: 1996 Registered: 9-2001 |
Why, are you going to replace them with Dino emblems ? ha ha, just joking. | ||
| Eric Eiland (Eric308gtsiqv)
Member Username: Eric308gtsiqv Post Number: 686 Registered: 11-2001 |
Yes, I believe you're correct Steve. The bottom panel(s) were sandwiched if I recall. | ||
| Steve Magnusson (91tr)
Intermediate Member Username: 91tr Post Number: 1531 Registered: 1-2001 |
Isn't it #47 that needs to come out to access the rear emblem studs? Is the black arrow in the SPC diagram pointing in the direction of forward chassis motion? | ||
| Dr Tommy Cosgrove (Vwalfa4re)
Member Username: Vwalfa4re Post Number: 837 Registered: 5-2001 |
HOLY COW! THAT many layers are in there? Please tell me I don't need to drop all the way down to part #45 to get the vertical plate off on the back of the trunk. | ||
| Eric Eiland (Eric308gtsiqv)
Member Username: Eric308gtsiqv Post Number: 683 Registered: 11-2001 |
I don't recall whether or not it was glued...if so, then it must have been dried out. I do remember that they are actually 2 or 3 panels thick and sandwiched together. The hardest part of the whole job was prying the panels away and free from their positions (used a flat blade screwdriver to help pry them out). There is also a bottom panel (trunk floor) that had to pry up a little as well (if I remember correctly). I did not completely remove the panels...just simply pulled them free enough to slip my hands and tools down in between to fasten the nuts, and to see what I was doing. There's quite a bit of insulative panels back there.... 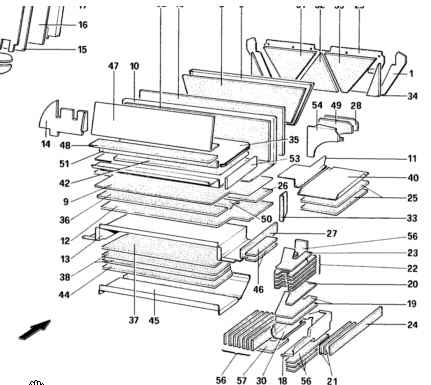 Yes, the task was initially a "daunting" one...especially not having any knowledge about how these items were assembled...but I knew that the car had to have the cavallino badge no matter what it took to get it on  . . | ||
| Dr Tommy Cosgrove (Vwalfa4re)
Member Username: Vwalfa4re Post Number: 835 Registered: 5-2001 |
I really appreciate it, Eric. I didn't know if that insulation panal was glued on or not. I didn't want to go pulling on it before I knew what to expect. | ||
| Eric Eiland (Eric308gtsiqv)
Member Username: Eric308gtsiqv Post Number: 682 Registered: 11-2001 |
I've only had to replace the cavallino badge on my 308 (was missing when I purchased the car, go figure). From what I recollect... 1. Unsnapped the trunk carpet panel(s) and slipped out the carpet from under the trunk lip to expose the insulation panel(s) behind. 2. The insulation panels are fitted behind the metal lip(s) under the trunk and along the rear bulkhead -- these panels are a tight fit. I pried them out (untucked them) from their positions enough to gain access to the inside of the rear body panel. When you do so, you'll see a little bit of white residue -- apparently these panels are made of some sort of white fiberglass type insulative material. 3. The cavallino badge has two studs that protrude through the body panel, and is held in place with two nuts on the inside. 4. Simply retuck the panels back into place, and fasten all the carpets back, and your done. Took about 15 minutes to do all this; and, since I'd only owned the car for 1 week, I had no idea what I was doing...so it was fairly straightforward. Not sure about the 308 / QV emblems. Looks like the 308 badge might be held on by studs (?), and the QV emblem is glued on (?) -- not sure...perhaps someone else can chime in here as well. Hope this helps. | ||
| Dr Tommy Cosgrove (Vwalfa4re)
Member Username: Vwalfa4re Post Number: 831 Registered: 5-2001 |
Can someone give me step by step instructions on how to disassemble the necessary parts from the inside of the trunk to get to the back of the emblems on a 308 QV? I have never had it apart and I really need to know what to do and what not to do. Thanks in advance. |