| Author | Message | ||
| Verell Boaen (Verell)
Member Username: Verell Post Number: 791 Registered: 5-2001 |
If Carmen's photo doewn't get you there, I've got an idea: Yesterday I threw out a knob because it had a hole in the side due to an air bubble. I'll dig it out of the trash tomorrow. If you haven't solved your switch problem by tomorrow night, let me know. I'll cut away enough of the sides of the knob so the tab area is visable & send it to you. You should be able to see what's going on. If all goes according to the latest revised as of 2 hours ago schedule, the 1st triple color coat will go on mid-day tomorrow. So I'll have tomorrow evening free. This project is slipping worse than my engineering schedules do. | ||
| Verell Boaen (Verell)
Member Username: Verell Post Number: 790 Registered: 5-2001 |
DJ, I don't have a photo of my headlight switch apart. However, Carmen's photo of his 328 switch might be helpful. Look at the 1st post in this thread: http://www.ferrarichat.com/discus/messages/112/212999.html The 328 headlight switch appears to be identical to the 308 switch except for the knob's exterior. & the interior diameters being slightly larger. I've got my car up on my lift with the doorways all masked up tight so overspray from the painting I'm doing can't get in. Unfortunately, neither can I... | ||
| DJ Geck (Djgecko)
New member Username: Djgecko Post Number: 36 Registered: 4-2003 |
Hey all! I received the remanufactured knob from Verell with wonderful results! Thank you for your skills Verell!  Verell: The replacement knob you made is exactly as it should be. You wouldn't by any chance have a pic of your headlight stalk without the knob on it so I can have an idea of the correct position of the metal connectors? There is a pic of the connectors on my headlight stalk at the beginning of this thread. I can get the connection to work but only when the knob is turned halfway? Thanks again! DJ | ||
| stephen r chong (Ethans_dad)
Member Username: Ethans_dad Post Number: 282 Registered: 3-2002 |
Thanks for the help Verell! I'll get it re soldered at first chance. Regards | ||
| Verell Boaen (Verell)
Member Username: Verell Post Number: 785 Registered: 5-2001 |
DJ - Hmm, best guess is that the little metal connections have gotten bent, possibly off-center, or some other way. I think you've bent the little 'ears' inwards slightly which is all I can think of. Hmm, upon further reflection, here's a guess: If the ears get bent too far inwards, the tab in the knob will bend them sideways instead of moving them apart vertically. If they're separating sideways, then operation is likely to be erratic as you're describing. I just double-checked the mold, & cut a knob I'd made apart to verify that the tab is rignt. It sure looks to be dead center of the knob. Steven - IMHO you're not endangering the tab inside the knob. There's very little clearance between the inside of the knob, & cylindrical piece that the contacts are rivited into. I expect that the tape has taken up all the clearance & is causing the knob to bind on the cylinder. Especially since the cylinder and knob may be slightly out of round. Thus the amount of binding would change with knob rotation. I strongly recommend you get that wire soldered to the rivit. Press connections such as you made are subject to tarnish and sudden failure at very inopportune moments. Just imagine what could happen if you're driving in heavy freeway traffic some night, and your headlights retracted because the wire stopped making connections again & jiggling didn't work... | ||
| DJ Geck (Djgecko)
New member Username: Djgecko Post Number: 35 Registered: 4-2003 |
Verell: Me again, well, I've got it working but barely. Is there a trick to getting it to work right? I moved the metal connections as close as I possibly could to make sure that when separated by the little plastic lip on the inside of the knob, it was separate the connection, thus making the lights go down. I'm sure it's just needs a little bit more tweaking and the knob itself is very sturdy, looks wonderful! Any suggestions would be greatly appreciated! DJ | ||
| DJ Geck (Djgecko)
New member Username: Djgecko Post Number: 34 Registered: 4-2003 |
Verell: Hey, I received the knob, looks wonderful! I replaced the spring and bearing, had no problem getting the knob back on, but the metal ends don't connect for some reason. When I remove the knob and press the metal ends together the lights work fine. The soldered connections are fine, what am I missing here? DJ | ||
| stephen r chong (Ethans_dad)
Member Username: Ethans_dad Post Number: 281 Registered: 3-2002 |
Verell, I opened up my stalk switch today and noticed that the solder of the upper contact wire has let go. The internal friction within the knob seems to provide adaquate contact, but sometimes requires a little nudging to work. I placed a very narrow strip of electrical tape around the contact solder and column to provide constant contact. I then reassembled the switch and it seems to work fine. Re-reading the thread, it occurred to me that I might be stressing the little plastic tab at the end of the switch. Do you feel this the case? I know that a re-solder of the wire would be best, but will my fix be a problem? I don't want to break the tab off in the switch! TIA | ||
| DJ Geck (Djgecko)
New member Username: Djgecko Post Number: 30 Registered: 4-2003 |
Verell: Thank you! | ||
| Verell Boaen (Verell)
Member Username: Verell Post Number: 774 Registered: 5-2001 |
The knob is in the mail at last, read your eMAIL. | ||
| DJ Geck (Djgecko)
New member Username: Djgecko Post Number: 28 Registered: 4-2003 |
Verell: Thanks for the info. I will contact Steve and see how much he is asking for the "diaper" LOL! I figured the paint would be a high temp paint. The exhaust grill on mine has one small rust spot right in the center back, other than that, it is in good condition. Would be nice to have a spare though. Also, on the knob, I'm sure you're more critical of your detail work and I know it will be fine. DJ | ||
| Verell Boaen (Verell)
Member Username: Verell Post Number: 763 Registered: 5-2001 |
Steven Rochelin is selling a US Spec exhaust grille. I've asked him to confirm that it's 'trim black' in color: http://www.ferrarichat.com/discus/messages/112/251461.html?1053519166 BTW, I just realized that you need a high temp paint for the exhaust grille. If so, it's available from EastwoodCompany.com & SummitRacing.com the SEM paint may not take the heat from the cats. | ||
| Verell Boaen (Verell)
Member Username: Verell Post Number: 759 Registered: 5-2001 |
I can't remember the original shade of black on the US Spec 308 QV. I suspect it is a matte black. If so, SEM makes an 'trim black' spray can that should be a pretty good match. Available from most auto body supply stores. The letters for 'LIG' of 'LIGHTS' molded into the knob ended up sufficiently shallow so that the white lacquer kept lifting out whenever I tried to clean up the unavoidable overflow. I've hand cut deeper grooves for these letters. I have to apologise, the result isn't quite as smooth as the original letters. At this point, I'm going with what I've got as I'm afraid of the letter quality going downhill from here. Put a little white lithium grease on the 'ears' of the contacts that the tab in the knob opens & closes. Also, put some on the round plastic base that the knob slides around, and on the ball & spring. Be sparing, a little goes a long way. | ||
| DJ Geck (Djgecko)
New member Username: Djgecko Post Number: 27 Registered: 4-2003 |
Verell: You are a busy man and I thank you so much for the work on the knob. I'm really looking forward to getting the interior back to looking normal again. It will seem odd to have the headlight knob there where it's supposed to be. I have a question though? Do I need to use some form of lubricant on the connection? Seems it was kinda greasy/oily after the knob was removed. I am in the process right now of taking the exhaust grill off, stripping it and repainting it. I do not envy you your body work on the 308. Any suggestions on the type of paint I should be using for that exhaust grill? I've only done body work to a car one time and it was enough to make me crazy trying to get it perfect. I've never painted other than small parts, I leave the big stuff to the professionals Let me know how the final product is and thanks again! DJ | ||
| Verell Boaen (Verell)
Member Username: Verell Post Number: 753 Registered: 5-2001 |
DJ, The white lacquer in the icons & lettering is on & curing overnite. Tomorrow I'll remove the excess & give it a 2nd coat. With luck I'll finish it Wednesday night & drop it at the post office Thursday AM on the way to work. You should get it Friday or Saturday. My 308 is making steady progress. Tonight I touched up a couple of dings I'd overlooked & finished masking it off and am doing some final pre-spraying clean-up. I hope to get the primer, sealer & color coats on it during Memorial day weekend(I HATE body work, it's so tedious). | ||
| DJ Geck (Djgecko)
New member Username: Djgecko Post Number: 25 Registered: 4-2003 |
Verell: Hey, good news! I'm looking forward to seeing the finished product. I was telling a local friend here in town about your molding of plastics and refabrication of interior pieces. Told him to go to this site and check out some of the threads. I haven't been home much this weekend and just saw your posted message. I hope you got a chance to do some non-work related activities this weekend. Thanks again DJ | ||
| Verell Boaen (Verell)
Member Username: Verell Post Number: 741 Registered: 5-2001 |
DG, WE HAVE A GOOD KNOB Yesterday's problem was process, not the mold. I cast another knob today & it came out fine. I'll fill in the lettering/icons tomorrow. A day for them to fully cure, a final polishing & it'll ship! re: DAYTONA switch stalk interchangeability If you post some photos, I can tell quickly. Someone told me once that the' 70s vintage Ferraris all used the same column switch. There are some differences: -The GTB headlight switch mechanism inside the twist knob, & the knob's interior shape is different from that of the 308/328 switch. -308GTB switch stalks have clear coated satin finished metal colored rods. 308/328 switches have black stalk rods. | ||
| Dr. I. M. Ibrahim (Coachi)
Member Username: Coachi Post Number: 270 Registered: 5-2002 |
I have a few bits and pieces from a stalk for a daytona and wonder if those stalks are interchangeable | ||
| Verell Boaen (Verell)
Member Username: Verell Post Number: 740 Registered: 5-2001 |
Well, made a knob today. Good news is the inside is fine. Bad news is that the outside has a rash - of pinholes, so you don't want it. I can't tell whether it's a faulty mold, or if I just took too much time mixing, then didn't get the mold under pressure soon enough. (I have ~1 minuite to mix the plastic, inject it into the mold, then close the pressure tank & get the pressure up.) I'll try making another part tomorrow. At worst I'll remake the outer mold section. The 308 emblem came out fine. I'm debating whether to sand & polish the scratches out of my original emblem and use it to remake the front mold section, or to rework a part out of the current molds & not risk the original. | ||
| Verell Boaen (Verell)
Member Username: Verell Post Number: 736 Registered: 5-2001 |
DJ, Sorry, but something personal came up tonite, so it'll be tomorrow before I get to make the knob. Randall, re:"My wiper lever is snapped off and missing ... done this repair yet?" You might say I've a tad of experience with the wiper stalk. Take a look at the 1st & 3rd threads linked in my post # 671 early in this thread. re:"How much would you want to do it?" It depends on what's broken. There are 2 ways it can be fixed: 1) I'll sell you a replacement wiper stalk & you can install it yourself. 2) You can send me your switch & I'll install a new stalk & refurbish your switch while I'm at it. Key question: Is there still a nub of the stalk in the switch, & can you use the nub to control the wipers? I'm hoping so as that will mean that the 2 U shaped contacts & their springs, along with the detent ball & it's spring are still in place(See the photo in one of the threads). Otherwise the contacts will have to be hand made from scratch, and I'll have to order some balls & locate some replacement springs. I'll have to have the switch to ensure the contacts & springs fit & work properly. It might be quickest to discuss specifics by phone. Send me eMAIL w/your phone # & I'll give you a call & we can discuss details & pricing. | ||
| DJ Geck (Djgecko)
New member Username: Djgecko Post Number: 23 Registered: 4-2003 |
Verell: I appreciate all the time and effort you are putting in to the repair of the headlight knob. Thank you, thank you! I'm preparing the car for the summer, polishing and waxing and all that good stuff. I just finished repainting the ashtray (my "friend" who tore off the headlight knob also stripped the paint off the ashtray lid!) LOL!! Sam: The production # of my car is 46039. I have approximately 10,800 miles on it now and it runs beautifully! There was another thread somewhere regarding valet parking, and believe me, I always park my own! I've checked the wiper and signal stalks on the column, and they seem to be in good repair. I feel much better knowing there is someone out there like Verell to help us out Thanks again, Verell! DJ | ||
| Randall (Randall)
Member Username: Randall Post Number: 464 Registered: 1-2003 |
Verell, My wiper lever is snapped off and missing (was that way when I bought the car) and I was wondering if you had done this repair yet? How much would you want to do it? Thanks for the help. | ||
| Sam NYCFERRARIS (Sam)
Member Username: Sam Post Number: 377 Registered: 4-2001 |
WoW, A Babe...anyone been around long enough to remember Dina and her heater hoses? DJ -- I have a 1983 308 QV too...my production number is 47109 maybe yours was a production sibling? Well the combination switch is famous..I have a thread here on repairing mine --wiper side of the switch....bottom line..Verrell is a god send..I admire this guy's perfection, patience and skill..DJ, never valet park your car or let someone with long legs and bony knees drive your car..there were days when a broken combo switch would practically mean the car was beyond economical repair but glad to hear about Verral and that these are now under 1K in price. the plastic inside these things (in the column) is so crappy its scary. | ||
| Verell Boaen (Verell)
Member Username: Verell Post Number: 734 Registered: 5-2001 |
DJ, GOOD NEWS: The headlight & mirror knob & 308 emblem molds all look good. I've got them curing at 120F tonight & will make parts tomorrow night. re: Bubble - A bubble in the mold would result in the part having a raised area. In the case of the knob, it could mean that it would have to be reworked before the knob could get over the end of the stalk. A bubble on the outer mold would be very unsightful to say the least. As to how many parts I've made. Haven't kept count. Probably 40 or 50 of the various parts. It took me 3 tries to get a usable mold for the switch end of the wiper stalk when I broke mine last summer. In the process I molded 7 or 8 parts. I made 3 sets of molds and 15 or 20 lever bezels before I got my process worked out. Then another 12 production lever bezels. After the lever bezel experience, I've only had to redo a couple of molds. One of them was because I somehow left a fingerprint on the master part. I've only made 2-3 parts of each new type because that's all that I had a buyer for. Last night's spill is the closest I've come to having a major problem since the early days when I was learning how to work with the materials and standardizing my process. | ||
| DJ Geck (Djgecko)
New member Username: Djgecko Post Number: 21 Registered: 4-2003 |
Verell: Sounds like things are going good, well....um until the RTV spilled. If there is an air bubble on the inside, it won't affect the function of the knob I'm sure. How many other plastic parts have you made with this process? How is the 308 badge coming? Keep me posted DJ | ||
| Verell Boaen (Verell)
Member Username: Verell Post Number: 731 Registered: 5-2001 |
Mold sections are now curing. (We won't talk about dumping a cup of catalyzed RTV all over my workbench, vacuum chamber, vice, & a small assortment of tools. Salvaged enough for the molds & the rest will peel off once it's cured. Meanwhile it's about the viscosity & tackiness of honey. - Definite tried working too late.) I expect to make test parts Thurs. PM. | ||
| Verell Boaen (Verell)
Member Username: Verell Post Number: 730 Registered: 5-2001 |
The inner mold looks good (Can't tell for sure until I've made the outer mold & can remove the inner mold from the knob. Inner mold still could have an air bubble in spite of the vacuum I pulled on it when I poured it). The 308 emblem's front mold also looks good. I plan to pour the other mold sections tonite. | ||
| DJ Geck (Djgecko)
New member Username: Djgecko Post Number: 19 Registered: 4-2003 |
Verell: Thanks for the update. I've been working on detailing the car so I've got plenty to keep me busy. I've got the foot rest pad next to the clutch pedal to reattach, and sooooo many other little things. Thanks again, DJ | ||
| Verell Boaen (Verell)
Member Username: Verell Post Number: 722 Registered: 5-2001 |
DJ, Poured the headlight knob inner mold section tonite. 8-6 job permitting, I hope to pour the outer mold section Tuesday nite. OFF-THREAD: A replacement 308 EMBLEM IN THE WORKS ALSO Also cleaned up my 308 emblem and poured the front section mold. When I went to strip the white paint out of the center of the emblem, I discovered that the emblem was not black chrome, but rathar a slightly transparent black lacquer over a white metal casting(yes, the black lacquer stripped off easier than the white paint did). Interestingly enough, the casting has a lot of little scratches that were completely concealed by the black lacquer. I'm going to make a part from the emblem molds, then sand/polish that part until all the scratches are gone & use it to redo the front mold. (Yes, I'll make @%$#$ sure that the cloth I'm polishing with does not have a concealed metal filing.) Only after I'm positive that I have a good set of molds will I try removing the scratches from my original emblem. | ||
| DJ Geck (Djgecko)
New member Username: Djgecko Post Number: 17 Registered: 4-2003 |
Verell: Thank you I put the old pic back that has the full view of the car in it. I can't find the CD that has the pics of just the car on it, so I guess I'll need to be finding it. And, no hurry on the knob, I've been working on detailing the interior and engine compartment among other things. I know that good things come to those who wait LOL!!! I appreciate your help very much. Thanks again, DJ | ||
| Verell Boaen (Verell)
Member Username: Verell Post Number: 719 Registered: 5-2001 |
WARNING: OFF-TOPIC POST... DJ,LOL!!! You shouldn't have cropped your picture! The earlier version led the viewer to focus on the car. The new version isn't letting the younger male viewers get past your profile. They haven't realized you're standing in front of your car... ItalianAuto, Seriously, I had a long technically detailed conversation with DJ about her headlight stalk & interest in cars. She's either as represented, or the best female impersonator I've ever spokenn with. Besides, I have her broken headlight stalk knob. No one would bust up a $1K column switch to perpetuate an impersonation... Now, then, let us return to the 'Technical Q&A'... BTW DJ, I spent all day sanding-filling-sanding-filling... trying to get my lower quarter panels ready to paint. Also blew a big chunk of my annual 3x8 maintenance budget on a DeVilbiss GFG-670 so when I finally finish sanding, I can't blame the final finish on the spray gun... Anyway, this is by way of saying I didn't work on your headlight knob. | ||
| DJ Geck (Djgecko)
New member Username: Djgecko Post Number: 16 Registered: 4-2003 |
Verell: Vouch for me will ya, they don't believe I'm a woman! DJ | ||
| C. Smith (Italianauto)
Junior Member Username: Italianauto Post Number: 146 Registered: 10-2001 |
Hmmmmm.....who here has the extra username?....The DJ Geck profile photo is obviously the job of a professional, with the use of a professional model.....BUT.....she is gorgeous, so thanks for the post! | ||
| DJ Geck (Djgecko)
New member Username: Djgecko Post Number: 15 Registered: 4-2003 |
Can't help chuckling myself LOL! I mean really! LMAO!!!! Verell: Thanks for the info on the "knob" er...ummm...."cap" Keep me posted and thanks! DJ | ||
| djmonk (Davem)
Member Username: Davem Post Number: 251 Registered: 1-2002 |
I know im not the only one laughing here!!! | ||
| Verell Boaen (Verell)
Member Username: Verell Post Number: 716 Registered: 5-2001 |
DJ- re: plastic polish I doubt that your knobs need polishing. Normal handling with the tiny amount of dust that's on your fingers does a pretty good job of polishing them. What you may want to do is just give them a gentle cleaning with a mild soap to get any oily handling residue off. Follow that with a polishing with a known clean & grit-free terrycloth. Your knob was quite well polished when I received it. It just had maybe 4 or 5 moderately deep scratches that no polishing was going to remove. Since it was to be used as the master part to make production molds, I needed to get even these scratches out. I wet sanded them out with 600 grit sandpaper, followed by wet sanding with 1000,1500,& 2000 grit. I then polished the knob with 3M plastic polish from an auto body store and finished up with a long dry hand polishing with a clean terry handtowel. SOMETIMES YOU JUST CAN'T WIN: Just as I was finishing polishing to a mirror finish, I gave the part a final rub down. When I went to admire my results, to my horror, I discovered that there was a major scratch going all the way around the knob! I just wanted to go somewhere & be sick. Somehow my terry cloth had picked up a stray iron filing from my supposedly clean workbench. The filing had gouged the knob, making scratches much worse than the original scratches! It took me 2 hours to get them out and to go up thru the finer grits back to the final polishing stage. I decided I'd wait & do the final polishing after I'd made the inner mold section. That way I'll get rid of any handling marks that might creep in. | ||
| DJ Geck (Djgecko)
New member Username: Djgecko Post Number: 14 Registered: 4-2003 |
Verell: Thanks so much, I'm looking forward to getting the knob back on and working. Beats the heck out of electrical tape LOL!!! Guess I'll have to polish the other knobs to match. Any advice on a good plastic polish? Thanks again, DJ | ||
| Verell Boaen (Verell)
Member Username: Verell Post Number: 705 Registered: 5-2001 |
REPLACEMENT KNOB PROGRESS REPORT DJ, I've glued the tab into the bottom of the knob. I am in the process of color sanding & polishing the knob to remove several small scratches that accrued over the years. Should finish polishing it tonight. I expect to finish the molds this weekend. They'll need 24 hours to fully cure, so most likely I'll make your new knob on or before next Tuesday night. The white paint in the Icons will need to dry overnight, and any excess sanded/polished off on Wed. nite. Bottom line: Your knob should ship on or before Thurs, 15 May. | ||
| Verell Boaen (Verell)
Member Username: Verell Post Number: 685 Registered: 5-2001 |
Gentlemen, I must quibble w/ the content of the last 2 posts: This is the 'Technical Q&A' forum. 'Off Topic' is: http://www.ferrarichat.com/discus/messages/132929/132929.html?1051794401 DJ, I do apologise for forgetting to say 'Welcome to the F*Chat' when you first posted. BTW, 308s really aren't more difficult to maintain than your earlier muscle cars. Just somewhat different, parts are harder to track down, and the manuals aren't as tutorial/step by step. The Technical Q&A's mission is to fill that gap & help rookies grow into seasoned Ferrari maintainers. | ||
| Mike Charness (Mcharness)
Member Username: Mcharness Post Number: 479 Registered: 8-2002 |
Shamile, that's because you haven't seen Nika with her yellow 308GTS. Check out www.racerchicks.com | ||
| Shamile Shams Kassam II (Shamile)
New member Username: Shamile Post Number: 12 Registered: 12-2002 |
I know this is off the mark but...DJ is a chick ! The " guy I was dating " threw me but I checked the profile. Wow, First Girl Ferrari Owner I've seen. Way Cool Shamile | ||
| Verell Boaen (Verell)
Member Username: Verell Post Number: 682 Registered: 5-2001 |
I'd like to end up with the knob if at all possible. This would give me a master part to use to redo molds as necessary. I need a master part because the molds have a useful production life of 25-35 parts, and deterioriate after about 18 months on the shelf. Thus they have to be regularly replaced. It takes 8-12 hours of labor to thoroughly clean & polish the master part, then make the inner & outer mold sections. I amortize this cost over the 25+ knobs the mold will make. If the inside of your part is identical to the 328 knob, then I might not have to repair your knob, just slip it over my 328 inside mold, cast an outside mold around it, and I'm in business. The mold material & making the mold won't hurt the part in any way. The mold material is a silicone that only sticks to other silicone. It does pick up extremely fine detail (down to the impression of large molecules I'm told!) from the master part. It will faithfully capture a fingerprint on a polished surface and reproduce it on the new part. If I have to repair the knob in order to make an inside mold, I can make a cosmetic repair by simply gluing the broken tab in place w/o having to use reinforcing pegs. I promise that you wouldn't be able to tell the difference between your original knob & the new one. If, in the end, you feel strongly about it, then yes, you can end up with your original knob. If you want me to make a fully functional repair to your original knob, then I'd have to charge you for the repair time. Consider this: A reproduced knob would be significantly lower cost to you than a functional repair to your original part. Also, a new knob will be new polyurethane plastic. While your original knob is old enough so that it's plastic is getting brittle. I suspect that age & brittleness was a significant factor in why it broke in the 1st place. Still, in the end, it's your knob. Perhaps we should take this up off-line. I'll email you my phone # & times when I should be available. | ||
| DJ Geck (Djgecko)
New member Username: Djgecko Post Number: 8 Registered: 4-2003 |
Verell: I agree that the inside of the "knobs" looks the same. I will try to obtain a replacement from Sodacom and if he doesn't have one I will have you repair the original one. I would be more than happy to send you the knob to make a mold, just let me know where to send it. Do I get it back? I also had figured out that the spring went into the small hole just at the base of the riveted area, it was the only logical place I could find for that and the bearing. Thank you everyone for all your help. I sincerely appreciate it. DJ | ||
| Verell Boaen (Verell)
Member Username: Verell Post Number: 676 Registered: 5-2001 |
DJ, It looks like your insides are identical (or at least extremely close) to Carmen's, and that the tab inside of yours broke off the same way his did. The quickest way to get you back in business is if Sodacoms (aka Dave) has a knob like yours. The alternative would be for me to make you a new knob. That way there'd be no question as to the knob's strength. In either case, I'd like to get your broken knob & the little tab. I'll use it to make a mold so that Unobtainium Supply can begin offering replacement knobs. re: BALL & SPRING There should be a hole in one side of the plastic stalk end that has the contacts rivited into it.(aka: the stalk piece shown in your initial post) The spring goes into the hole. The ball goes on top of the spring, and is pressed down into the hole while the knob is slipped over the end of the stalk. There should be a groove the length of the knob for the ball to ride in. | ||
| Greg Owens (Owens84qv)
Member Username: Owens84qv Post Number: 778 Registered: 10-2001 |
My headlight switch knob broke about 9 months ago. Cracked plastic knob. I've repaired the knob except now, the knob turns to easily and sometimes my knee turns the headlights on. I'm concerned that the spring and ball that cause the switch to 'click' are missing from my stalk. Does anyone have a picture or a diagram of how this assembly fits into the stalk? I'll pull mine apart and check to see if that is in there. | ||
| DJ Geck (Djgecko)
New member Username: Djgecko Post Number: 7 Registered: 4-2003 |
Here is a pic of the actual knob itself and the parts that go along with it. It isn't like the one in the thread, but the inside seems to be the same. And also the end of the stalk is pretty much the same. I have a picture of the open end at the beginning of these messages, my cry for "help" LOL!! 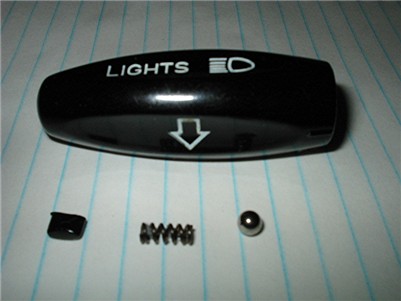 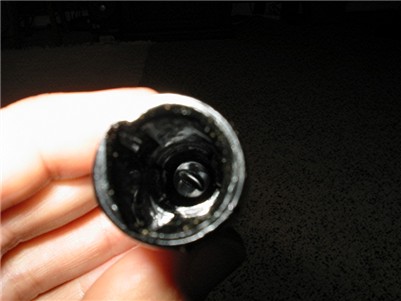 | ||
| Verell Boaen (Verell)
Member Username: Verell Post Number: 674 Registered: 5-2001 |
DJ, I'm confused as to what's damaged. I thought that the plastic stalk end that the contacts are mounted to had cracked across. ie: Is the plastic piece, with the metal contacts rivited into it, that's molded onto the end of the stalk (ie: the onethat's shown in your picture) intact? If so then I understand that just the outer twist knob is broken inside. If that's the case, then it sounds like a twist knob is all you need. If so, does the twist knob look like the one with the red arrow pointing to it in the 1st entry in this thread: http://www.ferrarichat.com/discus/messages/112/212999.html If so, I have a mold for making that twist knob, and can get you a knob in a few days. Even if the outside of your knob doesn't look the same, if the end of your stalk looks like the one in the thread (& It seems to), then I can use the inner part of the mold & your knob to make a complete reproduction knob. Of course, if Dave comes up with one, then you're all set. | ||
| C. Smith (Italianauto)
Junior Member Username: Italianauto Post Number: 144 Registered: 10-2001 |
Ahhhhhh....a car guy chat site with a nice looking lady providing entertainment....Thanks DJ....you made my hectic day very entertaining! | ||
| Jack Habits (Ferraristuff)
Member Username: Ferraristuff Post Number: 315 Registered: 4-2003 |
One more reason why I am a happy lesbian! (Caught in the body of a man though...) Jack | ||
| C. Smith (Italianauto)
Junior Member Username: Italianauto Post Number: 143 Registered: 10-2001 |
DJ.....you are real...I totally believe that...AND....I am now back at Ferrari Chat after a bit of an absence.... | ||
| DJ Geck (Djgecko)
New member Username: Djgecko Post Number: 6 Registered: 4-2003 |
You guys are killing me! Yes, that is really me in the picture with my car! I know, I know, not many women are into cars right? Actually, I have always been into old muscle cars and I just recently sold an old 73 Z28 RS to a guy in Ft. Lauderdale. But, that was a car I could actually do some of the basic work on myself, the 308 is a different animal altogether. Verell: I just posted a note about the spring and ball bearing. Actually, I was lucky to find them. After my "friend" dismantled the knob, I found these pieces on the floor and seat. I would just need to know where they go. I have a pretty good idea, but since I wasn't there when the knob was removed I have no way of knowing where they went. Thanks again! DJ | ||
| DJ Geck (Djgecko)
New member Username: Djgecko Post Number: 5 Registered: 4-2003 |
Parts man soda: The knob is the only thing that is broken, at least the inside pieces. The rest of the stalk is intact into the column. I also have a single ball bearing and small spring that I'm not sure where they go, so.......if I can just get a knob that was intact inside that would be great. Davehanda: I would love to collect from the bum, since he also owes me a sum of money. We live and learn don't we? I'm still working on getting it back. Being a nice person sometimes has it's drawbacks but I like being that way. Also, I did check out the info on the parking lights and printed out the info on how to rewire everything. My 83, of course, doesn't have that feature as I was reading some did. The previous owner of my car didn't change anything. Thanks for the link. Italianauto: I thought sure someone was going to chew me out for having my car in the sand in the picture. Believe me, I went over the car with a toothbrush after I got home. By the way, thank you for the complement as well. DJ | ||
| Verell Boaen (Verell)
Member Username: Verell Post Number: 673 Registered: 5-2001 |
DJ, There was a small spring & steel ball in a hole on the end of the shaft (the part that goes up into the twist knob). They cause the knob to 'click' into position. Hopefully you still have them. I'm pretty sure I know where to get replacement balls, but I'm less certain about the springs. (I suggest you keep all of the loose parts in a zipper lock snack/sandwich bag.) Dave, Please hold onto at least one known good headlight twist knob until I can verify that the one on the switch I have borrowed from you is good. I'm pretty sure it is, but just in case. If the knob I have isn't good, then I'll need to talk to you about borrowing the known good one for a couple of weeks to make a mold from it. BTW, Thanx to Carmen, Unobtainium can now supply 328 headlight stalk twist knobs. | ||
| C. Smith (Italianauto)
Junior Member Username: Italianauto Post Number: 142 Registered: 10-2001 |
It can't be true that we have a nice looking lady posting tech questions here....but....whoever took the time to create another ID, find the right picture, etc., etc.......THANK YOU!!!!! | ||
| Jack Habits (Ferraristuff)
Member Username: Ferraristuff Post Number: 314 Registered: 4-2003 |
>>>and I guess the car in the background is OK too!!.... Car!? What car? Jack | ||
| C. Smith (Italianauto)
Junior Member Username: Italianauto Post Number: 141 Registered: 10-2001 |
Hmmmmm....funny all the guys here didn't fall over each other after checking out DJ's profile....nice picture DJ.....and I guess the car in the background is OK too!!....lol.... | ||
| david handa (Davehanda)
Member Username: Davehanda Post Number: 679 Registered: 5-2001 |
DJ Gecko, I would collect from the bum. Then go to www.ferrariclub.com and check out the FAQ's. There you will find how to easily modify your headlight wiring to allow you to turn on the parking lights w/o having the headlights pop up. Will take you about 40 minutes to accomplish. Email me if you have questions. | ||
| Randall (Randall)
Member Username: Randall Post Number: 377 Registered: 1-2003 |
I know where you can get the complete assembly for $650. If you're interested send me an email. | ||
| Dave (Parts_man_soda)
Junior Member Username: Parts_man_soda Post Number: 156 Registered: 8-2002 |
Could you use just a knob, I have a box full of parts for these. | ||
| DJ Geck (Djgecko)
New member Username: Djgecko Post Number: 4 Registered: 4-2003 |
Unobtanium Supply: I will e-mail you some pics of the parts that I have. The cap that goes onto the end of the stalk is intact with no cracks except for a couple of internal plastic pieces of which I seem to only have one of. I did read the info on the wiper stalk and everything you did to repair/fix this problem. I was amazed. I've only worked on old Chevy's myself and this is not something I think I can do on my own. I will send you some more pics tomorrow and you can give me an assessment on what will need to be done. Again, thanks everyone! You have made what I thought was a major problem much smaller DJ Geck | ||
| Verell Boaen (Verell)
Member Username: Verell Post Number: 672 Registered: 5-2001 |
If you attempt to repair this yourself with an adhesive, here are some tips: I strongly recommend inserting some tiny metal 'pegs' across the joint to reinforce the repair. This joint gets a lot of shear stress when the switch is actuated and a glued joint by itself is unlikely to hold up to it(ask me how I know). The pegs will help distribute the shear stress so that the loading on any area is lessened. What's going to be challenging is that the break most likely goes thru the holes for the rivits that hold the small contacts, severely limiting both the area that you could slip reinforcing 'pegs' thru, and also limiting the area available for plastic-plastic bonding. (Plastic-metal bonds are generally much weaker than plastic-plastic bonds.) The glue I used for repairing my wiper stalk is still the only thing that I've found that will bond the plastic used in the column switch. | ||
| Verell Boaen (Verell)
Member Username: Verell Post Number: 671 Registered: 5-2001 |
Unobtainium Supply to the rescue... I can mold a new plastic end piece on your existing headlight stalk, or if necessary, make a complete stalk. I will need your headlight stalk, plus any broken off bits & pieces if you can find them. Turn-around time would most likely be 2-3 weeks + round trip shipping time. Since you're new to the F*Chat, here are some of Unobtainium Supply's credentials: Production Wiper & Turn Signal Stalks: http://www.ferrarichat.com/discus/messages/112/202534.html Early Lever Bezel update: http://www.ferrarichat.com/discus/messages/112/189905.html Experience repairing my own wiper stalk that led to my starting Unobtainium Supply: http://www.ferrarichat.com/discus/messages/112/107784.html There are a few other posts & photos that I didn't have time to search for. If you'd like a repair quote, please you email some fairly high resolution photos of the broken area from different angles to: [email protected] so that I can completely assess what will be need to be done to complete the repair. Best case will be if the end piece has simply cracked across, but no significant pieces have been lost. It looks like this may be the case. Ballpark is $150-$250 depending on what needs to be done, & whether you want me to refurbish your entire switch ass'y. | ||
| Hans E. Hansen (4re_gt4)
Intermediate Member Username: 4re_gt4 Post Number: 1211 Registered: 4-2002 |
I doubt you'll find a Fiat replacement. The column switch is infamous. Do a search of the Archives. This problem is brought up quite a bit. Verell Boaen is making replacement parts for these switches, although I'm not sure about the headlight switch part of it. Someone about 2-3 months ago had detailed how they repaired this part of the switch. Again, so a search. The info is there! | ||
| DJ Geck (Djgecko)
New member Username: Djgecko Post Number: 3 Registered: 4-2003 |
Hey, thanks so much for the replies. I'm going to try the local Fiat/Lancia thing first and then the glue, but after that, well....I may have to break down and shell out some more money. Hmmmm......maybe I should ask the guy I was dating (who pulled it apart in the first place) to help me pay for it? Probably not, huh? I found the thread on all the gluing and plastic work and have printed out some of the information on that as well. Thanks again! | ||
| Paul Sloan (Sloan83qv)
Member Username: Sloan83qv Post Number: 560 Registered: 3-2001 |
$900 for complete unit which includes all three stalks. | ||
| david handa (Davehanda)
Member Username: Davehanda Post Number: 676 Registered: 5-2001 |
Try this magic glue...www.coolchem.com it is worth a try...I have had tremendous results with gluing things that would not stick with epoxies and super glues.... | ||
| Horsefly (Arlie)
Intermediate Member Username: Arlie Post Number: 1066 Registered: 5-2002 |
$900 for a piece of plastic? You could probably have a local machine shop fabricate a decent repair. Amazing that Ferrari plastic breaks just like other plastic but yet it costs ten times as much to replace???? | ||
| Paul Sloan (Sloan83qv)
Member Username: Sloan83qv Post Number: 559 Registered: 3-2001 |
I have a brand new one that I will sell for $900. [email protected] | ||
| Frank Parker (Parkerfe)
Intermediate Member Username: Parkerfe Post Number: 2198 Registered: 9-2001 |
I would take it to a Fiat or Lancia repair shop and see if you can match it up. | ||
| DJ Geck (Djgecko)
New member Username: Djgecko Post Number: 2 Registered: 4-2003 |
Hi, I know I'm being a pest but there has got to be someone out there who can give me some information on getting the control knob on my headlight stalk repaired. I contacted T.Rutland and got the standard $750 for repair but am sure there has got to be another way. Here is a pic of the headlight stalk without the control knob on it. The plastic on the inside has broken off and when turned will not make the right connection to keep the headlights up. Anyway, any help would be appreciated. Thanks again  |