| Author | Message | ||
| Lloyd (Lloyd)
Junior Member Username: Lloyd Post Number: 100 Registered: 8-2001 |
Larry, it looks as though we start in the glove box and move accross from there. This may determine if removal of the lower dash is also required. Have yet to look under dash on left side to see where to start on the left side. | ||
| Jeff Green (Carguy)
Member Username: Carguy Post Number: 326 Registered: 10-2002 |
Larrybard...I would simply say "go slow". Most of the fasteners are philips screws with speed nuts and such. There are some actual small bolts too. But just looking at things from many angles first, to determine where all the screws are, and how to get at them. Then just dig in and go. There are sort of "layers" to the dash, as the parts are removed in a sort of order, and reassembled in the reverse of their removal. Like the glove box on my car. 1. Remove the little light housings on either side, attached with philips screws. 2. Then remove the hollow pivot bolts using appropriate wrench or socket. 3. Now the remove the glove box. I think this is how it goes...can't remember exactly. But I'm sure you get the idea. It's good to have a small socket set and also a set of short screw drivers, as space is sometimes tight. A small telescoping magnet is good too when things are dropped or whatever. Just go slow, keep the screws and bolts with the related dash piece and set them aside. As I remove parts, I lay them out on the floor or work bench in the order of their removal. And I sometimes put bolts/screws in little baggies, or just tape them to the corresponding piece. Or you can just stick them into their appropriate holes on the piece. The key is to be organized. But these Ferraris, at least older ones, are very straight forward in their construction. Also label any wires that you may run into, you'll be happy you did later on as you put things back together. Well, that's about it for me. Good Luck! | ||
| larrybard (Larrybard)
New member Username: Larrybard Post Number: 2 Registered: 6-2003 |
Could someone, for my personal edification, provide perhaps the first few sentences of "The Idiot's Guide To Removing Interior Trim Pieces"? I'm serious. I've never attempted this in any car -- and certainly don't expect to learn on The Red Car (instead I expect to be looking over the shoulder of my mechanic/friend as he tackles this) -- but I sure would like to know something about the basics, if there are any useful generalizations about how the dashboard pieces are attached and how they're freed without doing permanent body damage. Thanks. | ||
| Lloyd (Lloyd)
Junior Member Username: Lloyd Post Number: 98 Registered: 8-2001 |
Thanks, I am in recon mode right now and don't plan on doing job until this winter. I have yet to research the leather issue and will try your restretch technique first. In attempting these projects I am always afraid of either braking something or taking too many things off only to find out that the job could have been done much easier and with much less risk to parts that did not need to be disturbed. | ||
| Jeff Green (Carguy)
Member Username: Carguy Post Number: 324 Registered: 10-2002 |
Lloyd...I have a TR not a 512TR, so things are a bit different for your car. But removing any small panels will certainly help gain access to the bigger pieces. The speedo-pod on my car is very easy to remove, just secured with a few bolts. But the little piece between the pod and the steering column must be removed to get to the bolts. I always label everything like wires, screws and bolts, etc. It takes time in the beginning, but makes things go much quicker later on. The remote glove box opener is nothing but a solenoid and is no big deal. Just go slow and organize things. My dash had two areas where the leather had shrunk, and also been torn away. I asked all the upholstery shops in my area to help, but they all said they can't match the grain and color of my dash. So I ended up actually peeling the damaged leather off the dash peices, soaking it, re-stretching and blocking it, and then re-attaching it. It turned out very good, and I didn't have to try and match the color. The stretching is very difficult and a bit risky, but I had nothing to lose by trying. If your leather is simply shrunk a bit, it may be possible to restretch it. James is correct that experienced people can do this job quickly, but for novices like me it takes hours. But you feel pretty good when you get the job done and done right. | ||
| James Selevan (Jselevan)
Member Username: Jselevan Post Number: 583 Registered: 6-2002 |
While I have yet to do mine, John Amette, previous western regional service manager for FNA said that they got it down to 45 minutes to remove and replace. Just about every TR beginning in 1986 and never ending had shrinkage and damage of the leather dash or instrument pod. These were replaced under warranty, and the service guys could get these in and out during a bathroom break. The first time, I am sure, will take forever. The second time it is a breeze. Kind of like brain surgery. Jim S. | ||
| Lloyd (Lloyd)
Junior Member Username: Lloyd Post Number: 95 Registered: 8-2001 |
Jeff, I have a 512TR with leather damage on the top of the dash to right of speedo instrument cluster and plan on repairing it at some point in the future. This photo (of someone else's dash sold on Ebay)is of the part that I need to repair. 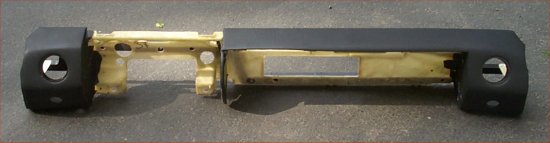 I would also appreciate any tips on removal of the dash. Such as where to start, any tips or issues that I might not forsee. Do I first remove the lower part of dash which is not damaged? Any tricks to dealing with the remote unlatching glove box? Thanks | ||
| Jeff Green (Carguy)
Member Username: Carguy Post Number: 322 Registered: 10-2002 |
Good point James...I too had some issues due to the cannister back there. Larry, the dash is not terribly difficult to disassemble. But GREAT CARE must be taken not to damage or scuff the leather pieces. If you go slow and keep things organized (nuts & bolts) it's not too bad of a job. I had to tear apart my TRs dash and center console twice to fix little things. Just dont start prying, yanking, or excessively pulling on anything. It all comes apart with patience. Actually, in my opinion Ferraris are somewhat easier to work on than regular production cars because they are assembled more like race cars than domestic cars. By that I mean there seems to be fewer "hidden" bolts and screws, and less "snapping or latching" mechanisms that once together have to be broken to take apart. Definately check out the vacuum system first. Good Luck! | ||
| James Selevan (Jselevan)
Member Username: Jselevan Post Number: 582 Registered: 6-2002 |
Larry - hold a moment. Are you sure it is not the vacuum line that controls the flapper? I had the same experience. Thought it was under the dash. Read the workshop manual, which described the vacuum assisted mechanism. Followed a small black rubber tube from the firewall to a cylindrical-shaped vacuum reservoir over the left rear wheel. Tube was hanging lose, having cracked from heat and age. Snipped off an inch and reinserted it on the cylindrical can's connector. Solved the problem. Jim S. | ||
| Larry Bardfeld (Larrybard)
New member Username: Larrybard Post Number: 1 Registered: 6-2003 |
The a/c vent directing cold air at my windshield appears to be blocked. I view this as a serious safety issue, since on very humid days the windshield can get fogged up, interfering with visibility. (Rain-X antifog helps a little.) If I (actually, a close friend who is an experienced, ASE "master" mechanic, though with no Ferrari experience) need to remove the dashboard to deal with blockage, are there any tips for doing so? I don't know anything about how it's disassembled, and more importantly don't know how unusual the task would be for someone who primarily works on Hondas, Nissans, etc., so any pointers would be greatly appreciated. Thanks, Larry ('92 512TR) |