| Author | Message | ||
| Phil Hughes (Ferrarifixer)
New member Username: Ferrarifixer Post Number: 2 Registered: 7-2003 |
Hi again. Thanks for the comments. The alternator bolt only needs to slide back a bit to remove the alt.It doesn't need to come right out...imagine the consequences! Ferrari do some odd things...but not stupid. Yes, If the pump is fine leave it unless you know you'll wake up screaming at the thought of what if! | ||
| James Glickenhaus (Napolis)
Intermediate Member Username: Napolis Post Number: 2111 Registered: 10-2002 |
You GO Dude! | ||
| Simon Campbell (Simonc)
Junior Member Username: Simonc Post Number: 118 Registered: 2-2002 |
Hi Aussie Phil (ferrarifixer) Great to have you on the list, especially as I have a 365 BB. Are you on Frank's Boxer mailing list? Perhaps we should talk via email - [email protected] Simon | ||
| Jeff Green (Carguy)
Member Username: Carguy Post Number: 396 Registered: 10-2002 |
Boxer 12: The manual I used was for early TRs. My shop manual had Mondial info. in the section I needed, so Henryk (here on fchat) was kind enough to copy and send me the pages from his manual. Thank You again Henryk! My oil leak appears to be the front crank seal. Can anyone with experience tell me how to replace it? It looks pretty standard, but I'd like to hear first-hand. Phil Hughes: Thank You for the helpful hints. That AC compressor tip is a biggie I never thought of. I couldn't remove my Alternator due to the pivot bolt being too long, so I just assumed the AC pump would be the same story. I'll take another look at the shocks, I couldn't tell when removing the retaining nuts which three had to come out, so I did them all. I will look and make a note of this for the future. Lastly, my waterpump looks clean and "new" with no leaks of any kind. Would you recommend that I leave this item alone then? Do these only need servicing when a leak develops and not the "often preached" preventive rebuilds? Thank You Very Much for sharing your knowledge. This board never ceases to amaze me with kindness and consideration of all the wonderful people. I would NEVER in my wildest nightmares think of doing this work if not for fchat. | ||
| Phil Hughes (Ferrarifixer)
New member Username: Ferrarifixer Post Number: 1 Registered: 7-2003 |
Hi fella's. I'm new here but have read for a while now. I've been fixing Ferrari's for 40 hours every week since 1987 and am happy to comment and share my experience here. I currently maintain a fleet of 360 challenge cars, and 360 N-GT cars until this year, and also just lately, a couple of maserati trofeo race cars...but my background until 3 years ago was really road Ferraris from 1970 to 1998. I am self employed, and establishing a specialist outlet in Melbourne, although I'm from Kent in England. It's great that you all love to get stuck into your cars like this at home, and well done for what you have achieved! A few labour savers for this job are.... 1- The AC comp can be left connected and just removed and tied up in the bonnet area...this way you dont pollute the atmosphere with your gas, but really you get to preserve a working ac system and don't introduce damaging oxygen into the receiver/dryer from open connections. (So at least shove some rags or rubber bungs on your ac hoses!) 2- The shock studs are 4 each, but if you look closely you'll see only 3 need to be undone to remove the subframe....one of them has a cut out on the upper part so that the shocks don't fall through the gap. 3- There are many short cuts to take if looking, and on a hoist it is quite possible to do a belt and tensioner replacement, full fluid change and basic service in about 20 hours from start to finish....and that's doing it all as per schedule. The water pump overhaul is a scare tactic and often mechanic finger trouble can cause more headaches than it's worth. Test the bearings for only a minute amount of slack and if there is no leak from the seal, then you really are just job creating to overhaul it. The seals are easy to damage when replacing and you can't tell or fix it until it's too late...believe me...I did it...once. If you must do it, take great care or get your best contact to do it for you. There's many little tricks to ensure a good job. I could go on, but I'll keep reading for a while and come back... | ||
| Jim Avery (Boxer12)
New member Username: Boxer12 Post Number: 47 Registered: 6-2003 |
What manual did you use? I am pulling the clutch on my TR and this job makes my job seem so little in comparison, it emboldens me. Way to go. I had a little oil leak and my mechanic found a stripped head cover stud. He retooled it and fixed it in about an hour. Where was your leak? (The engine looks pretty clean.) | ||
| Henryk (Henryk)
Member Username: Henryk Post Number: 952 Registered: 8-2001 |
Jeff: Correcting the manual would help many of us. You could even clarify some procedures.....like the throttle cable removal? I certainly would be interesed in a copy of the revisions. | ||
| Jeff Green (Carguy)
Member Username: Carguy Post Number: 392 Registered: 10-2002 |
Hello Tom...just read your handle.....ferrarioldman....that's a good one! | ||
| Tom Jones (Ferrarioldman)
Junior Member Username: Ferrarioldman Post Number: 140 Registered: 6-2002 |
Henry, to answer your questions, the hood doesn't have to be removed and the small grill does need to come off. | ||
| Jeff Green (Carguy)
Member Username: Carguy Post Number: 391 Registered: 10-2002 |
Hi Henryk...I removed that little front grill section hoping it would help me in removing the alternator. This is before I was going to pull the motor, I was just hoping to remove the left side cambelt cover. But that didn't work out as we all know. I would remove it anyway as it's not hard to do and provides a bit more access. As for the engine bay hood, I can't for the life of me figure out why you would have to remove that. The manual does say to do it, but I don't see why. It is a bit in the way but not too bad, mainly the hood struts are the big inconvenience. I welcome any more questions you may have, so ask away my friend. I guess I should sit down and go through the procedure as outlined in the manual pages you sent me, and note any discrepancies, maybe even re-write line by line in a more understandable way. There were a few items not listed, but overall it was very good. | ||
| Henryk (Henryk)
Member Username: Henryk Post Number: 950 Registered: 8-2001 |
Jeff: I asked a question, but it stayed in the archive section.....regarding stage 1. It appears that the engine lid does not have to come out, as stated in the manual. Also, the grill section in front of the lid, is seen on the floor in one of your pictures.....did it have to come out? GREAT JOB!!!!!!!! Thanks | ||
| dave handa (Davehanda)
Intermediate Member Username: Davehanda Post Number: 1342 Registered: 5-2001 |
Jeff, Impressive work. I am here with you in offering moral support! Great job thus far. Please be safe... Wishing your car a speedy recovery. :-) | ||
| Ernie (Ernie)
Member Username: Ernie Post Number: 763 Registered: 11-2001 |
ATA BOY JEFF!!!! I have the engine out of my 348 also. Now that you have pulled it yourself, do you agree that the dealers are ripping you off? After I pulled mine out, the first thing that crossed my mind was that they are crooks. Anyhooo nice job brother, nice job. | ||
| Jeff Green (Carguy)
Member Username: Carguy Post Number: 387 Registered: 10-2002 |
The answer is "yes" to all questions asked so far. I am replacing belts, tensioner bearings, and rebuilding the waterpump. I am also going to replace all hoses, just don't know where to get them or how much is needed (lengths). I would also like to replace the fuel filters. Gotta take some time, sit down with the parts manual and figure everything out, and start shopping. Since I live in nowheresville, I will have to do everything by mail order. I will probably be buying from one of the sponsors here on fchat....just not sure which one, they are all so helpful. I will post more pics when I tear into this thing. The thing to remember is to do things one step at a time. If I looked at the whole picture - I'd say "forget it". But taking small bites out of the whole project is the way to go. I never would have dreamed (...or nightmared) that I would be doing this kind of work on a Ferrari. Anyone with reasonable mechanical ability and a somewhat logical brain can do this job. And since it's my car I'm working on, you can bet I'll go the extra mile and be meticulous about details and do things right...to the best of my knowledge and ability. Thank You again to my Ferrari brothers...one big happy (though somewhat disfunctional) family. | ||
| Vincent (Vincent348)
Member Username: Vincent348 Post Number: 878 Registered: 4-2003 |
Way to go! thanks for the pics. Vincent. | ||
| Ben Lobenstein 90 TR (Benjet)
Intermediate Member Username: Benjet Post Number: 1169 Registered: 1-2001 |
Don't forget new timing belt TENSIONERS too (since I hadn't seend it mentioned - I wanted to throw in red flag)... These are almost as important as the T-belts. -Ben P.S. Good Job | ||
| Jeff Green (Carguy)
Member Username: Carguy Post Number: 386 Registered: 10-2002 |
Thank You Everyone...it's nice to have one's work appreciated by those that know what it's all about. Henryk...I actually have a total of two days work to get the engine out, spaced on week apart. Not as bad as I thought it would be. Still not fun...but not bad. Gonna do the detail thing before re-installing. So it will be a few weeks or so before shes back on the road. Pending any unforseen setbacks. | ||
| Steve M (Steve308gtsi)
Junior Member Username: Steve308gtsi Post Number: 127 Registered: 5-2002 |
Jeff, Besides fixing the oil leak are you going to replace the cam belts, water pump etc. while the engine is out? I'm impressed you did it solo in your garage. It never hurts to have a buddy around while installing to make sure things line up and clear more easily. Again, nice going. | ||
| Henryk (Henryk)
Member Username: Henryk Post Number: 947 Registered: 8-2001 |
Jeff; I really didn't think that you would have the engine out so fast!!!!! WOW!!!!! Another week and you will have the engine back in, enjoying the rest of the Summer cruising in the TR. Good luck!!!!! | ||
| '75 308 GT4 (Peter)
Advanced Member Username: Peter Post Number: 2934 Registered: 12-2000 |
Excellent work Jeff! | ||
| rob guess (Beast)
Junior Member Username: Beast Post Number: 96 Registered: 5-2003 |
Jeff; Great job you will be back out enjoying your TR in no time. Rob | ||
| Jeff Green (Carguy)
Member Username: Carguy Post Number: 384 Registered: 10-2002 |
Thanks Steve...I kinda whooped right now. But maybe tomorrow I'll remove the cambelt covers and determine the oil leak source. This is the reason for the engine pull in the first place. Now that I know what to expect, I'm pretty sure I could yank out a TR engine in maybe 6 to 8 hours using just hand tools, no air compressor in my shop. I must say, I was very scared when lowering the engine. So many things can go wrong if your careless or in a hurry. Re-installing that thing won't be a walk in the park either! But I am rather proud that I did it on my own. | ||
| Steve M (Steve308gtsi)
Junior Member Username: Steve308gtsi Post Number: 126 Registered: 5-2002 |
Jeff, Very nice job! Please keep us posted with your work. And don't forget pictures  . . | ||
| Jeff Green (Carguy)
Member Username: Carguy Post Number: 383 Registered: 10-2002 |
Well guys, I finally got that big aluminum lump out! It was difficult, but to me any engine pull is a big job. Again, I followed the shop manual to the letter, but there were some omitions. The manual says each shock has three bolts, two 17mm and one 13mm, but my car had four bolts, two of each, at each shock. I also believe there was a water hose disconnect that is not mentioned, but pretty much everything else was spot on. Very refreshing for a Ferrari manual. I was going to use a dolly, but instead a friend said to use his high-tech trans hoist with adjustable leveling. I did use it, but it appears the drivetrain is a bit heavier than a transmission, and much more awkward to level up. The most trouble was given by the shock studs hanging up, they may not even look like they are, but THEY ARE! The passenger's side studs really gave me a hard time. Other than this it all went without surprises. Well, see the pics for more info: As you can see, I misjudged the balance or center point of the engine, so it is tilted upwards in front. Actually this cut down on fluids leaking out during removal. But I would like the engine level, and will set it on wood blocks and reposition the jack so everything is as it should be. But it still wasn't too bad this way as it helped clearance from the radiator cooling fans. You must be careful not to crush them as there is no room. 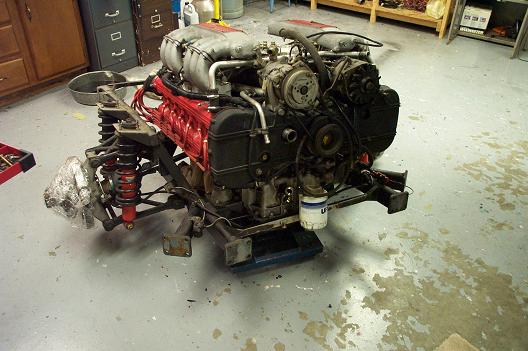 Here is a shot from the rear, it looks much worse in this pic than it actually is: 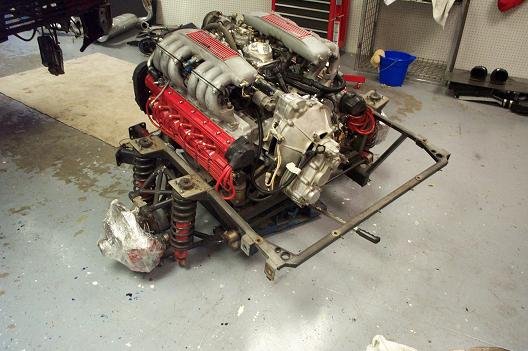 Here is the hansome profile shot: 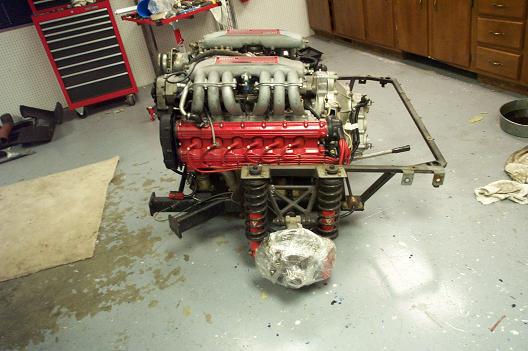 Here is the vacant engine bay - lots of room now!  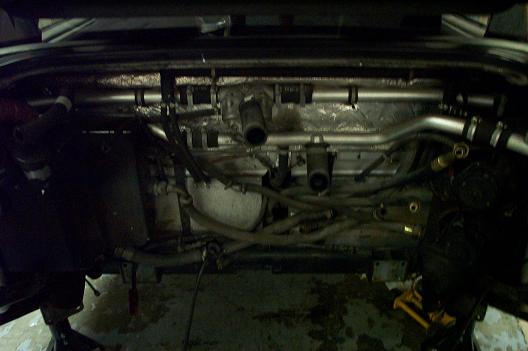 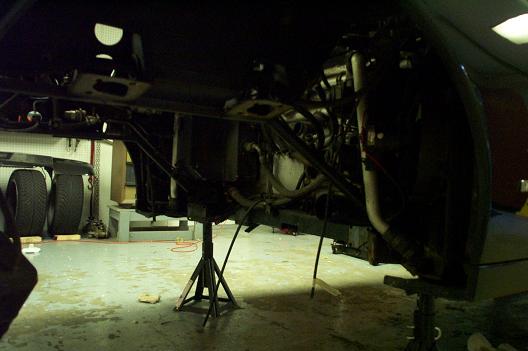 As you can see I took the wheels off the car. I did this to limit the height to which I would have to raise the car. When the engine was loose, and the rear was has high as the jacks would go I adjusted the jackstands. Then I used a jack in the front and lowered the front until the front spoiler was within 2 or 3 inches from the floor. This "pivoted" the rear end up high enough for me to roll the engine out even on it's tilted angle. 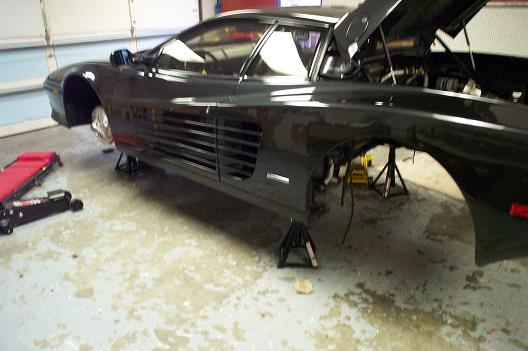 |