| Author | Message | ||
| Jeff Green (Carguy)
Member Username: Carguy Post Number: 509 Registered: 10-2002 |
Phil, thanx for the tip on removing the plugwire looms, I wasn't sure how I was going to do it. I put these new ones on last fall, they were in stock but exensive for what they are! And I surely don't want to buy another set! I will be experimenting with crinkle paint this weekend, and if things go right will paint the cam covers. Heat is important for the crinkle to "crinkle" properly. I've heard a few methods, but have an idea of my own to try. If successful I will post pics. Thanks to everyone for all the positive feedback, at times that's the only thing that keeps me going! | ||
| James Glickenhaus (Napolis)
Advanced Member Username: Napolis Post Number: 2559 Registered: 10-2002 |
Very nice. | ||
| David Feinberg (Fastradio2)
Member Username: Fastradio2 Post Number: 327 Registered: 4-2002 |
Gents, I don't want to hi-jack Jeff's thread, but to answer your questions: Stock OE dual pumps... Aeroquip line i.d, both feed and return same as stock rubber hoses... Fuel pressure at carbs within factory specs...4psi. Fuel volume, measured at any carb...on spec, per WSM. The engine problem was a bad set of new OE wires...bad crimps! Thank you...and onward. David | ||
| Malcolm West (Ferrari_uk_tech)
Junior Member Username: Ferrari_uk_tech Post Number: 120 Registered: 7-2003 |
David, Your engine detail looks great, but do agree with Phil regarding the fuel pipes - if you are going to check the fuel pressure it should be between 3.5 - 5.0 lb sq in MW | ||
| Phil Hughes (Ferrarifixer)
Junior Member Username: Ferrarifixer Post Number: 167 Registered: 7-2003 |
Your 365BB tuning problems may be due to that hideous fuel hose set up. You have altered your fuel return/bleed off hose to the tank, so unless you have changed the pumps to ones that can idle without pumping, you're flooding your float chambers if the hose is too small, or simply pumping fuel back into the tank if the hose is too big.....unless that blue junction thing has a pressure relief built in.... The original pumps are rotary vane pumps that "whirr", and cannot idle. Bendix/Facet or other pumps with idle capabilities will usually "tick"...very slowly while idling and faster when running. Why would you change from standard fuel set up???? It works fine up to 450BHP, and with twin parallel Red top Bendix pumps...up to 600BHP! Have you got more than this? Or are the original banjo fixings missing??? | ||
| Paul Bianco (Paulie_b)
Member Username: Paulie_b Post Number: 772 Registered: 1-2003 |
one more thing....this process has helped me get great scoring points at many concours over the years and also a few Platinum awards at Cavallino. On the TR, try it on those "red heads". just don't spray heavily; just a mist. | ||
| Paul Bianco (Paulie_b)
Member Username: Paulie_b Post Number: 771 Registered: 1-2003 |
just my 2 cents.....I also detail my engines and keep them nice and clean. when I am done with the process and after everything is dry I lightly spray some of the metal components with silicone spray and some with WD-40. helps keep everything real nice and a light spray on the heads make them look great. just a light coat; don't get carried away. | ||
| David Feinberg (Fastradio2)
Member Username: Fastradio2 Post Number: 326 Registered: 4-2002 |
Jeff, Here's a picture of my 365BB engine near completion....though with a few tuning problems to resolve. -Valve and timing covers were media blasted and painted with Eastwood Black Wrinkle paint. -The block and bellhousing were disassemble, degreased...cleaned with wire wheel cleaner, and lightly painted with VHT 550 alu engine enamel. -The connecting rod access covers were removed, blasted and re-plated... -The coolant overflow tank was blasted and repainted with VHT Black Epoxy paint... Very rewarding, though time consuming process... 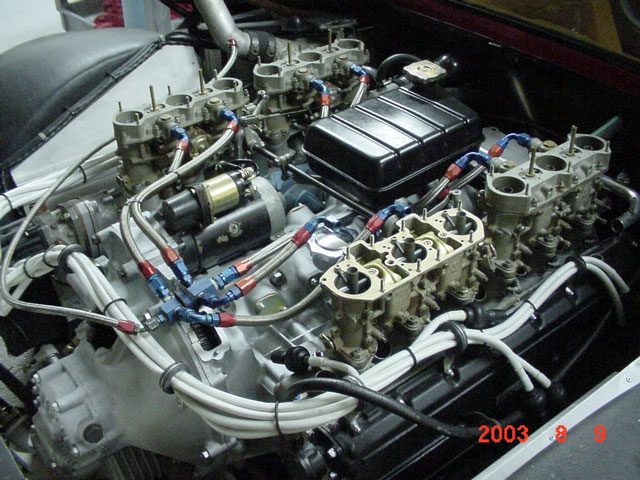 | ||
| Phil Hughes (Ferrarifixer)
Junior Member Username: Ferrarifixer Post Number: 163 Registered: 7-2003 |
Nice job so far. To do a nice job of painting your cam covers, the plug lead clips can be got out and re-fitted. If you order new ones, they seem to come with larger size clips and the leads keep falling out. It's happened to me several times now, but I haven't queried it, so it may just be a local thing. To get your original ones out, look for the little plastic peg that's inserted in the clip. Drill a tiny (2mm?) hole into it and screw in a self tapper (3mm?) about 5mm deep, but use a screw thats about 40mm long. Use pliers to pull the peg out with the self tapper. this will release the spread lugs inside and enable removal of clip without breaking it. It only takes a few minutes, and makes the world of difference to painting the covers nicely. It also means you can keep going without waiting for the "no stock" new clips to come....... To refit, either just push the peg back in, or if you don't like the little hole showing...just turn the peg over as you shouldn't have drilled right through it, or find some plastic rod at a hardware store. Good luck | ||
| Vincent (Vincent348)
Intermediate Member Username: Vincent348 Post Number: 1027 Registered: 4-2003 |
Jeff, Wow, very nice! Vincent | ||
| Darryl - TR&328 (Tr328)
Junior Member Username: Tr328 Post Number: 79 Registered: 6-2003 |
Jeff, great job. Everyone appreciates the pictures and keeping us updated on the challenge of performing your own service. Really informative! | ||
| Jeff Edison (Euro308guy)
Member Username: Euro308guy Post Number: 418 Registered: 7-2002 |
Jeff, Your work looks nice. Great job on the disassembly and cleaning. I can personally recommend powder coating. | ||
| Eric Eiland (Eric308gtsiqv)
Member Username: Eric308gtsiqv Post Number: 966 Registered: 11-2001 |
Jeff...you're TR engine detail is really turning out great! I never realized just how many nooks and crannies there were on the TR engines until seeing your pics. I'm currently in the process of doing an "engine in" detail on my TR -- just a good thorough cleaning and polish, but nowhere near the extent as yours. Keep us updated on your progress please. Ben -- if it wouldn't be too much trouble, I'd like to see a couple of pics of your engine detail job, if you wouldn't mind posting them. This would be great inspiration.  Indeed, Rub-and-Buff works wonders on the metal castings. Magoo turned me on too the stuff. I used it on my 308's engine over a year and a half ago, and it still looks new! A little bit goes a l-o-n-g way. | ||
| Ben Lobenstein 90 TR (Benjet)
Intermediate Member Username: Benjet Post Number: 1191 Registered: 1-2001 |
Rub and buf works great, not sure how well it holds it's color over time...Jeff contact me I have a ton of engine cleanup pics (I hope you have a big emailbox). -Ben | ||
| Henryk (Henryk)
Intermediate Member Username: Henryk Post Number: 1175 Registered: 8-2001 |
What ever happened to "Rub-and-Buff"?..... aluminum paint applied by hand? There where previous posts on how everyone seemed to like it. Any comments from anyone? | ||
| Henryk (Henryk)
Intermediate Member Username: Henryk Post Number: 1174 Registered: 8-2001 |
Considering the age of the car, I would remove the headers, and check for cracks and leaks. Let's face it......it seems that the car won't be driven till next Spring, regardless!!!!!! | ||
| Jeff Green (Carguy)
Member Username: Carguy Post Number: 505 Registered: 10-2002 |
Hi Henryk...I used a fine glass media on the plenums and stuff. On the engine block I just scrubbed forever using a variety of brushes, brake cleaner and anything else that would work. The aluminum will not come out perfectly clean like new, but since I'm gonna paint the engine it doesn't matter as long as the surface has no residue. This has turned out to be a big job! I'm ordering new fuel injectors this week, since they are only $21 a peice. The orginal ones don't look too good. The pic of the engine makes it look cleaner than it really is. It's good, but not spotless. I may pull off the headers too, not sure yet. But since I'm in it this far.... | ||
| Henryk (Henryk)
Intermediate Member Username: Henryk Post Number: 1173 Registered: 8-2001 |
Jeff: What blasting media did you use on the aluminum? Did you blast the block?......if so, how did you avoid getting the blasting media into all the little holes, with covers, etc. off? | ||
| Tom Bakowsky (Tbakowsky)
Member Username: Tbakowsky Post Number: 572 Registered: 9-2002 |
That looks really good Jeff!! Just a little tip for ya if you haven't already done so, change the thermostats while the engine is out of the car. I just did the job on a TR today with the engine in the car,and needless to say the world now has a few new swear words!! | ||
| Jeff Green (Carguy)
Member Username: Carguy Post Number: 504 Registered: 10-2002 |
Well I've had a productive afternoon. I bead blasted the intake plenums, cam covers, and water goosenecks. I think they look pretty good, and am hesitant about painting them. But to be "correct" I must lay on some black or gray crinkle paint and fog on silver over it. But I may just paint them silver and forget about doing the crinkle finish. By the way, although bead blasting works great, you need to get ALL the little media out of there. So I'm going to thoroughly wash these parts with soap and water and flush the dickens out of them. You never know what particles may be lurking in there. 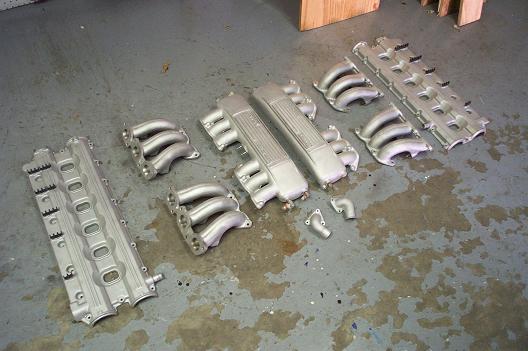 I'm also in the process of scrubbing the top of the engine....what a job! So many cracks and crevices to get into. That motor sure is wide looking setting there "topless" like that.  At times I question my sanity as what started out as a simple belt/tensioner change has turned into a near nuts & bolts resto. of the engine bay. But what the heck...I'm single it's not like I have a social life here in "Hooterville". Comments and suggestions are welcome as I would be interested in what others have done to restore their engines. |