| Author | Message | ||
| Verell Boaen (Verell)
Intermediate Member Username: Verell Post Number: 1022 Registered: 5-2001 |
JRV, I understand your argument about possible heating effects on the spring strength. However, fuse blocks & other brass electronic components that depend on spring strength usually come with solder tabs formed as extensions of the brass that serves as a spring. IMHO, soldering temperatures are not high enough to affect the brass's spring tension. I've never had a problem with loss of spring tension due to soldering. (We won't discuss melted plastic tho.) I've replaced many a fuse block that had failed becsuse someone put too large a fuse into it & the brass clip lost tension due to overheating. Usually the plastic mount was also seriously melted/charred. I believe you'll seriously start melting the block's plastic before you affect the spring tension. Where's the metallurgist that's a member when we need him? | ||
| Barney Guzzo (Trinacria)
Member Username: Trinacria Post Number: 346 Registered: 8-2002 |
I would prefer the correct one but I don't know when it will be available. | ||
| Barney Guzzo (Trinacria)
Member Username: Trinacria Post Number: 345 Registered: 8-2002 |
JRV I am just trying to say that I can try to modify the new one since it is not costing me anything. Mark is not asking me to send it back. If I make a mistake, it does not cost me anything but a few minutes of time. If they get the correct one in, I will buy it. | ||
| JRV (Jrvall)
Intermediate Member Username: Jrvall Post Number: 2093 Registered: 11-2002 |
>>Makes me feel better just in case I ruin the new one. << Somehow that Logic escapes me. | ||
| Barney Guzzo (Trinacria)
Member Username: Trinacria Post Number: 344 Registered: 8-2002 |
Mark Thanks a million! You guys have been great. I will give it a try. Makes me feel better just in case I ruin the new one. Verell, If you don't mind, that would be great! It would be greatly apriciated. Please send me your address and I will send it to you right away. I will try to modify the new one in the mean time. Need it back at your earliest convienence. Thanks. | ||
| JRV (Jrvall)
Intermediate Member Username: Jrvall Post Number: 2092 Registered: 11-2002 |
There is one more aspect to the Heat problem. The fuses are held in place by 'spring pressure'. The metal fuse holding piece is turned into a spring by the bending of it into a shape. This spring tension relaxes when heated, it actually never returns to it's original spring strength when heated as the compressed metal at the bends changes and work/heat hardens. From what I've witnessed, these fuse blocks appear to be lasting on the order of 10-15 yrs. And that's with the ceramic fuses installed that are well known to corrode at the tips. With a lifespan of that lenght and the availibility of Glass Stainless Bullet Fuses and even Gold Bullet Fuses all this re-engeneering by melting the plastic before installation seems uneccesary imo. | ||
| Barney Guzzo (Trinacria)
Member Username: Trinacria Post Number: 343 Registered: 8-2002 |
Sorry Hans, 1981 308 GTBi (USA) Barney | ||
| Verell Boaen (Verell)
Intermediate Member Username: Verell Post Number: 1018 Registered: 5-2001 |
Barney, Sure, be glad to solder your old one for you. I'll send you eMAIL w/my address. How soon do you need it back? (I need to reserve an free evening to do it.) | ||
| Stephen E. Schroeder (Seschroeder)
Junior Member Username: Seschroeder Post Number: 70 Registered: 4-2002 |
There was a discussion about replacing the stock fuses with the new glass tube type. I followed this lead and haven't had a bit of problems. worth considering. http://www.ferrarichat.com/discus/messages/256120/202907.html | ||
| TomD (Tifosi)
Advanced Member Username: Tifosi Post Number: 4294 Registered: 9-2001 |
Good job mark | ||
| Mark Langfield (Ferrari_co_uk)
Junior Member Username: Ferrari_co_uk Post Number: 56 Registered: 4-2003 |
Hi Barney, Right...bit of clanger here, the diagram I posted was for the right hand fuse box, sorry. Also the fuse box we sent you is for a Euro Spec car, it had been filed as a US spec fuse box, I have now rectified this. Unfortunately we now don't have any US spec fuse boxes in stock, so how about I refund your card for the fuse box I sent you, but you can keep that fuse box, which if you modify by breaking the bridge to resemble your existing fuse box should work OK. Please let me know if this is acceptable. Sorry for the inconvenience. Best Regards Mark | ||
| Hans E. Hansen (4re_gt4)
Intermediate Member Username: 4re_gt4 Post Number: 1603 Registered: 4-2002 |
Barney: Again, what car are you talking about? I think your wiring diagram is one for the Steve Magnussen archives. Most/all diagrams that we've seen show the upper right 3 terminals (which includes the fuel pump) wired together! Mine is clearly so. What year/model? Interesting stuff. Oh, and PS: If Verell doesn't take you up on it, I'll solder your fuseboxes. It'll cost you a beer if I ever visit your area! | ||
| Hans E. Hansen (4re_gt4)
Intermediate Member Username: 4re_gt4 Post Number: 1602 Registered: 4-2002 |
Go, Verell, Go! Go, Verell, Go! You explain it better than I do. Basically, you have to solder any metal-to-metal connection. And, yes, you'll probably melt some plastic in the process. The trick is to use the proper wattage soldering iron. Too little heat and you have to wait for the metal parts to come up to temp. In the mean time, the plastic melts beyond recognition. To much heat/wattage, and you again overcook things. It's sort of tricky, but if you ever have assembled an old HeathKit, you probably have the touch. You don't need to fill up the rivets. The rivets themselves are very low resistence. It's the connections where they contact the other parts that are the problem. And, yes, I melted some parts of my fusebox. But not to where they were dimensionally screwy (technical term). Everything fits, and the fuses are tight. And I'll never have to worry about this part of the car again. | ||
| Barney Guzzo (Trinacria)
Member Username: Trinacria Post Number: 341 Registered: 8-2002 |
Got it! I know I checked it before, but just to be sure I didn't make a mistake I checked it again. My old fuse box is correct. Here is the wiring diagram: 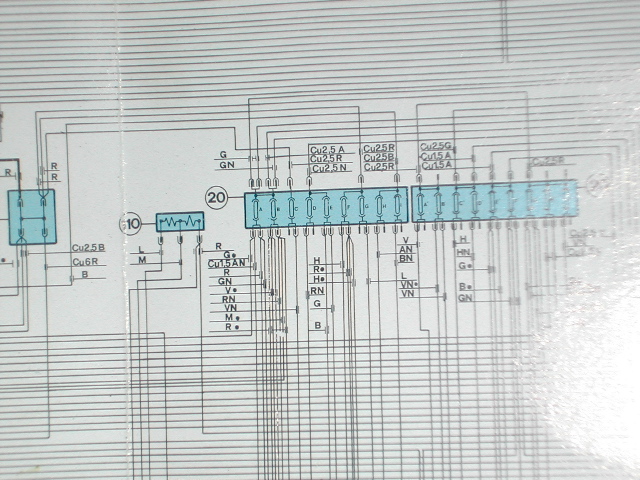 The third fuse is for the fuel pump only. Also. note that the top of the fuse box has the first two connections with 2 posts on each. This is not on the newer box either. | ||
| Barney Guzzo (Trinacria)
Member Username: Trinacria Post Number: 340 Registered: 8-2002 |
Verell Are you interested in soldering my old fuse box? | ||
| Verell Boaen (Verell)
Intermediate Member Username: Verell Post Number: 1017 Registered: 5-2001 |
re: SOLDERING CAUTION: This is not a soldering job for a beginner. It takes practice to get to the point where you can solder something like this w/o damaging the plastic or getting a crystalized (aka 'cold solder') connection that won't hold up. I cooked a lot of fuse holders, tube sockets & switches the first year or so I was doing electronic projects & repair. The primary goal of the soldering is to convert a mechanical pressure connection into a solid metal gas tight connection. To do any good, you need to get the solder to 'wet' and flow around the joint between the edge of the rivit & the brass busbar. Similarly for the rivit-fuse clip or rivit-spade connector joint on the other side. Also you want to get the back end of the piggy-backed spade terminals soldered to the fuse clip. The challenge is to achieve this without damaging the plastic. Heating the plastic to near melting is unavoidable as 60/40 electrical solder melts at 370F! The trick is to use only enough heat to the joint so that it melts the soler. Then let the plastic cool again without disturbing it mechanicly during the entire process. To pull it off you need to put a lot of heat very quickly into the surface of the side you're soldering, & let the heat of fusion of the melting solder absorb most of it. Most likely the rivits will unavoidably be slightly looser in the plastic than before. However, this is OK as the soldered connections ensure a much lower resistance joint that simply won't heat up again & loosen further. Luckily, the fuse block plastic looks like it's fibreglass filled which increases it's stability under heat. Filling the rivit with solder will significantly lower it's resistance. However, attempting to do it is even more risky than just soldering the joints as the rivit has to be heated throughout it's length, then filled with a significant amount of molten solder that will take a while to cool down. The chances of ruining a fuse block are much higher if you try filling the rivit holes. EQUIPMENT: When doing electrical soldering, ALWAYS USE ROSIN CORE SOLDER. Acid Core solder is OK for plumbing, but it will corrode & destroy electrical connection & the associated terminal in a couple of years. I prefer a Weller 100/140W dual heat soldering gun, the kind w/the heavy copper wire tip. It generates a lot of heat, but the heavy leads that mount the tip also cool the tip down quickly when the trigger is released. You can pre-heat the tip & dump that as a burst into the joint being soldered just by touching the hot tip to it. A soldering iron can produce a lot of heat due to it's mass, but it's much harder to control how much heat is going into the joint. The soldering irons with the thin steel tips are very hard to control & get much hotter when they do heat up. re: FUSES Change them to glass fuses. The original ones are trouble waiting to happen. At minimum, twist the original ones around to ensure the best possible connection every month or so. Just my $0.02. | ||
| Jay Grande (Jay)
Intermediate Member Username: Jay Post Number: 1447 Registered: 10-2001 |
I thought I had a new pic of the fuse boxes but I don't! I'll have to take one tomorrow. My new one was also incorrect. I have to make a jumper. The first three posts should be together but only the first two are. No big deal since there are two terminals on the top of the new box. BTW this is a 308 GT4 fuse box, but I bought GTB boxes, almost identical except for the mentioned terminal difference. | ||
| Barney Guzzo (Trinacria)
Member Username: Trinacria Post Number: 338 Registered: 8-2002 |
Jay No picture. Can you upload again or send them to me via e-mail? Thanks | ||
| Jay Grande (Jay)
Intermediate Member Username: Jay Post Number: 1446 Registered: 10-2001 |
I just went through this. I replaced both boxes while I was at it. Instead of fixing the problem, people put higher fuses, causing even more heat! I checked with the owners manual and rewired and refused each terminal so that it is now correct. I also got rid of all the "extra" wires transplanted into the box for radio and amps ect. Should solve the heat issue now. 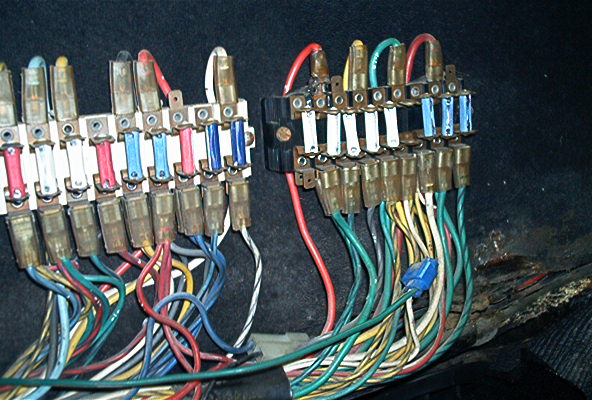 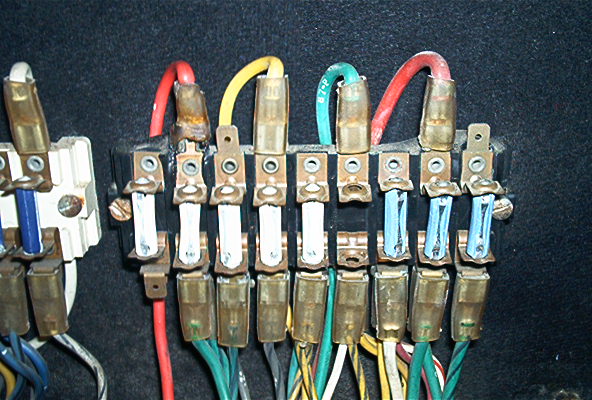 | ||
| Barney Guzzo (Trinacria)
Member Username: Trinacria Post Number: 336 Registered: 8-2002 |
Mark Steve is right. The picture you are showing is the right fuse box not the left. | ||
| Barney Guzzo (Trinacria)
Member Username: Trinacria Post Number: 335 Registered: 8-2002 |
Steve I checked the numbers and they are correct according to the owners site but it is definitly not the correct box. Frank I read many times on this site about soldering the fuse box but no one seems to have ever posted a picture. My question is - what do you solder? Do we just drop solder down the hole of the rivit? Do we solder the joints where the rivit and bridge meet? Steve and Hans I got rid of the ceramic fuses a year ago because every time I would take them out they would fall apart. I hated them and changed them to GBC glass fuses. Hans, we have these plastic ceramic type fuses that are standard on a lot of foreign cars. They are made really cheesy IMHO. Picture below. JRV I was wondering about that myself. I wondered if putting heat to this thing would put any damage to the plastic housing. 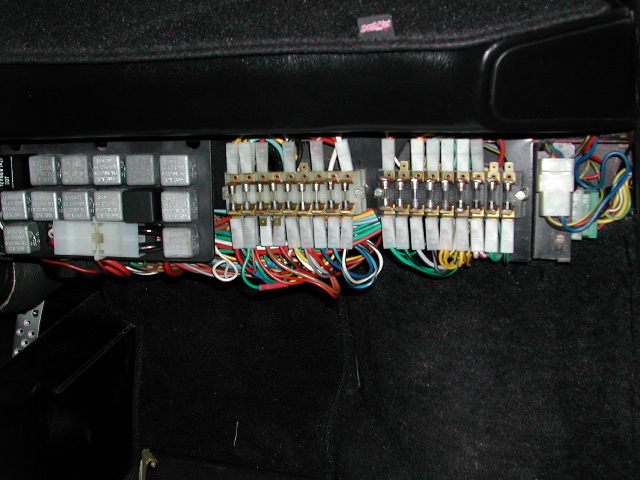 | ||
| JRV (Jrvall)
Intermediate Member Username: Jrvall Post Number: 2091 Registered: 11-2002 |
Guys, I'm not so sure I'd be applying what melts the plastic and causes the pins to loosen in the first place ie:-> Heat. The resistance across the circuit that creates heat that causes the plastic to soften, which allows the pins to loosen which causes more resistance is long thought to be the result of poor contact caused by corrosion on the ceramic fuse tips providing inadequate contact surface area. | ||
| Hans E. Hansen (4re_gt4)
Intermediate Member Username: 4re_gt4 Post Number: 1596 Registered: 4-2002 |
Not sure what you mean by 'glass fuse'. My old fusebox has glass fuses. | ||
| Steven R. Rochlin (Enjoythemusic)
Member Username: Enjoythemusic Post Number: 618 Registered: 4-2002 |
My apologies for chiming in but... Constantly hear about these fuse box problems, so why not uninstall it and put in a proper replacement that uses glass fuses? You have a modern solution with MUCH better contact area. The previous owner, Jeff Edison, did just that on the 308GTS QV here. see http://www.ferrarichat.com/discus/messages/256120/202907.html My apologies accordingly, yet we all know the stock fuse blocks are horrid so it makes sense to completely replace to a different solution IMHO. Enjoy the Drive, Steven R. Rochlin | ||
| Hans E. Hansen (4re_gt4)
Intermediate Member Username: 4re_gt4 Post Number: 1592 Registered: 4-2002 |
Uh, what kind of car are we talking about? On my 1975 GT4, the old and new fuseboxes look like the new one - bottom photo. And follow Frank's advice: Solder the crap out of it. Every place where there is simple metal-to-metal contact should be soldered. It will then be the last fusebox that you'll need. Otherwise, you might as well buy a spare, because you'll eventually need it. | ||
| Steve Magnusson (91tr)
Intermediate Member Username: 91tr Post Number: 1984 Registered: 1-2001 |
Mark -- In my notes the white fusebox is on the left side. Also, on the "new" part shown in Barney's post, the three upper terminals tied together are the three leftmost; whereas, on the schematic that you posted it's the three rightmost upper terminals that are tied together (the view on the schematic is "looking thru" the fuseboxes as mounted). | ||
| Barney Guzzo (Trinacria)
Member Username: Trinacria Post Number: 334 Registered: 8-2002 |
Mark, The owners manual and wiring diagram shows the old one have to be correct. | ||
| Barney Guzzo (Trinacria)
Member Username: Trinacria Post Number: 333 Registered: 8-2002 |
Mark Is that the correct side? Or is it the black (right side) box in your picture. | ||
| Mark Langfield (Ferrari_co_uk)
Junior Member Username: Ferrari_co_uk Post Number: 55 Registered: 4-2003 |
Hi Barney, That is definately the one for your car, part #60743400. I have checked the fuse box against the wiring diagram, and it clearly shows that there should be a bridge along those three joints. We haven't had a problem with these before. So that leaves the thought that maybe your old one had been modified, but I don't know why that would have been the case! Best Mark  | ||
| Frank Parker (Parkerfe)
Advanced Member Username: Parkerfe Post Number: 2789 Registered: 9-2001 |
FYI, most knowledgeable Ferrari techs will solder those rivetted joints before installing for a better electrical connection. That will avoid the problems with heat and melting that often results when the rivets vibrate lose over time. | ||
| Steve Magnusson (91tr)
Intermediate Member Username: 91tr Post Number: 1981 Registered: 1-2001 |
If you provide equal functionality (via modification) I don't see why it wouldn't work OK (if you don't inadvertantly loosen any joints), but that looks schematic-wise like the white (left side) fuse box for a carbed 2-valve (F PN 40196909) whereas the 2V-i (US) SPC shows a F PN 60743400 for the white fusebox. What PN is Ferrari UK matching? | ||
| Barney Guzzo (Trinacria)
Member Username: Trinacria Post Number: 332 Registered: 8-2002 |
I received a new fuse box from a sponsor. It is different then mine but according to the owners site, it is the correct number. If I install it there will be a problem. Can I "cut" or "seperate" somehow the three tied together on the top right (bottom picture) of the fuse box to become the two together and one seperate like the old one (top picture)? 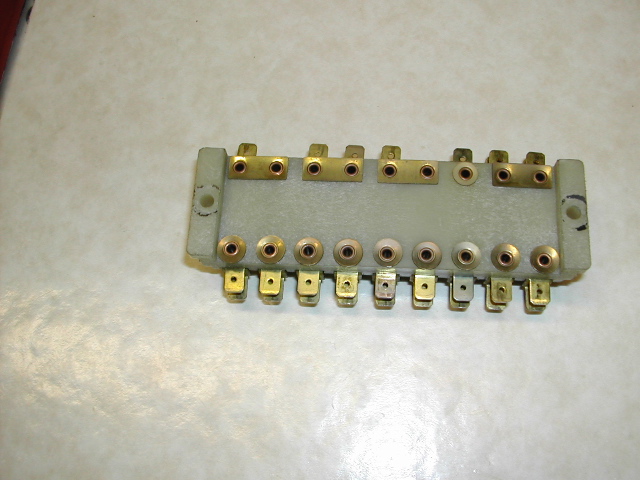 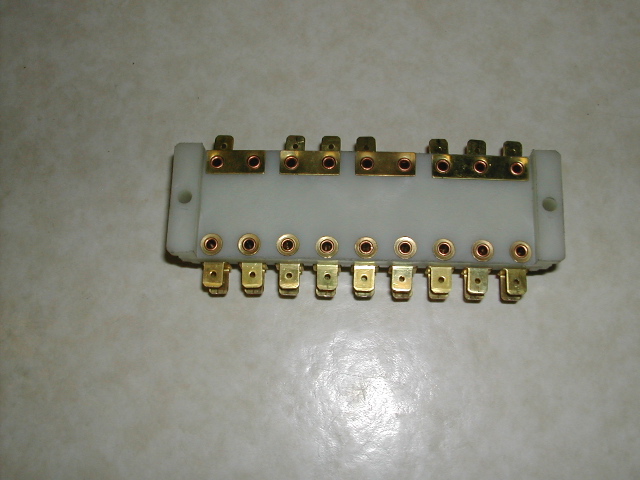 |