| Author | Message | ||
| Verell Boaen (Verell)
Intermediate Member Username: Verell Post Number: 1056 Registered: 5-2001 |
SOLDER SIZE CORRECTION Now that I'm @home, I checked the solder I used for Barny's fuse block. It's 1/16" diameter Ersin Rosin Core solder. The 'fine' solder I mentioned must be about 1/32" diameter. The spool I have lost it's lable years ago. While the soldering on Barny's block isn't as 'pretty' as I'd prefer, it's definitely making good electrical connections. One thing that you can't see in the photos is that the dual connectors also have the seam where they join soldered. | ||
| Barney Guzzo (Trinacria)
Member Username: Trinacria Post Number: 372 Registered: 8-2002 |
Dave, my old box with the gbc glass. I did that last year as a starting upgrade. 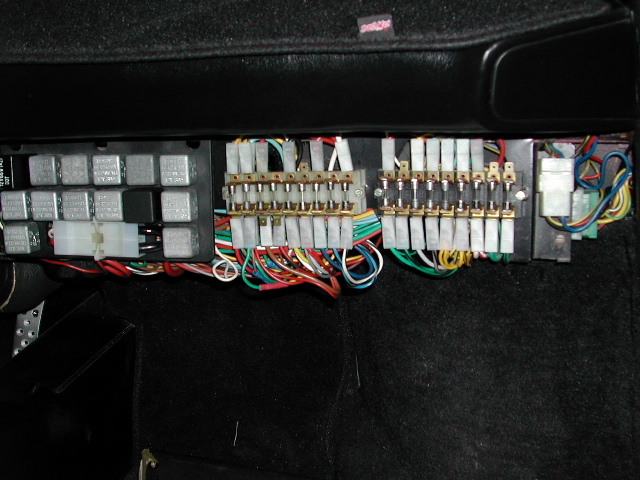 | ||
| dave handa (Davehanda)
Intermediate Member Username: Davehanda Post Number: 1530 Registered: 5-2001 |
Verell, Nice work! Barney, don't forget to clean those contacts with a little alcohol and Scotchbrite pad as needed. Also, bend the tabs (gently) together a bit so the fuses hold tighter. And DO get the glass fuses if possible. Don't use the cruddy ceramic ones if you can help it. | ||
| Barney Guzzo (Trinacria)
Member Username: Trinacria Post Number: 371 Registered: 8-2002 |
Note the number 3 "fuel pump" terminal and how burnt it was. That was my original reason for starting this project. The fuse would be burning hot but not blow out. The metal on the fuse would actually get so hot you would burn your finger tips instantly. I replaced the fuel pump, accumulator and cleaned the tank strainer and the car ran MUCH better, but the fuse still got hot. Sometimes the car would even shut down. Again thanks Verell. | ||
| Barney Guzzo (Trinacria)
Member Username: Trinacria Post Number: 370 Registered: 8-2002 |
Here they are. Thanks Verell!!!!! With all the solder, you can feel how much heavier it is, ha! Verell did a GREAT job. Putting it in about 10 minutes. 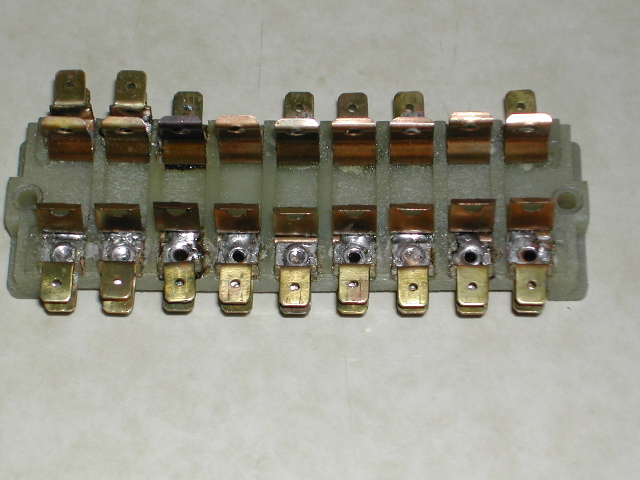 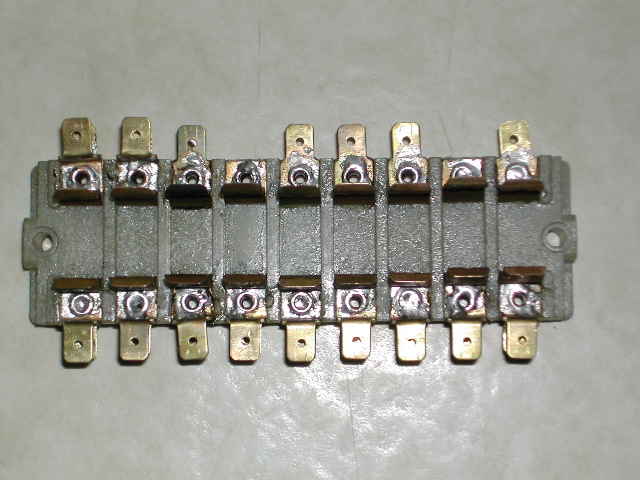 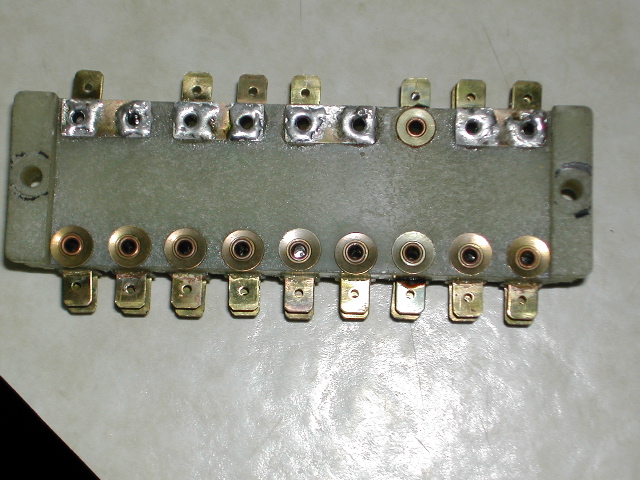 | ||
| Barney Guzzo (Trinacria)
Member Username: Trinacria Post Number: 369 Registered: 8-2002 |
Verell Box should be here tomorrow and pictures will be up asap. | ||
| Verell Boaen (Verell)
Intermediate Member Username: Verell Post Number: 1048 Registered: 5-2001 |
Hans, I don't like liquid fluxes for fine electrical work for the same reason you don't want to have any water in the joint you're working on(see below). If you've got the joint good & shiny with a small ss brush, you actually could probably get away w/o flux at all. The rosin core flux is almost over-kill! Mike, Yes, go for the 150/230W Craftsman gun. Just looked at it. It uses the heavy gauge square copper wire with a larger copper tip that you really need for this work. Most likely it's made by Weller as that tip is unique to them as far as I know. Looks to be a much better match to this job! You can always drop back to the lower heat if necessary. I had my gun full-on for a large % of the job & was wishing for a little more heat. Right 60/40 rosin core solder. The most critical characteristic is the melting point, the lower the better. 60/40 is classified as a 'low temp' solder. However,I'm pretty sure I've seen some ultra low temp solders out there, but didn't have time to research them. If you see a silver bearing solder, check the melting point. Most of them melt at a higher temp. than 60/40. Not sure of diameter, looks to be about 3/32". It's the std size that most places sell as electrical solder. It's small enough to melt & flow quickly, large enough so that you get a reasonable amount melted at once. I always have 2-3 rolls floating around between the bsmt & garage workshops. Most HW stores, Sears, Radio Shack, etc. carry it. Just don't try to use the 'fine' size that's about 1/16" or less. Melts very quickly, but you have to take too much time to feed enough of it to fill the area around a rivit. Result is you'll overheat the joint & melt the plastic. Same for the ~1/8" diameter solder sold for plumbing use. Takes too long to start melting, & then you get too much for the joints you're working on. Also, See the tips I posted in the other thread. SOLDERING TECHNIQUE: I pre-heated the tip until it began to smoke before I touched it to the joint. Quickly touched the end of the solder in the angle between the tip & the joint so that the solder helped make a thermal path between the tip & the joint. Lifted the solder almost as soon as it started to melt. What seemed like a small amount generally turned out to be just the right amount for the joint. The solder to releases more than enough flux to cover the joint. Then moved the solder to the other end of the joint & lifted it as soon as it started to melt. Usually just enough melted & flowed along the joint before I could get the solder lifted. If not, move on to another joint & come back to this one after the plastic has had time to cool down. The melting solder actually cools the joint down, thus helping protect the plastic. Trick is to melt just enough to do the joint, or at least 80% or so of it. Better to not completely fill the joint than to melt the block. On the double tab joints, I'd do one joint, then skip over two to do another one. That way minimized the heat from one joint pre-warming the plastic under another joint. Feel the plastic. After 3-4 joints, the whole block will have heated up. Probably a good time to put it in the freezing compartment of a fridge for 10-15 minuites to chill it down. DO NOT GET WATER ON IT, it will get under the rivit heads, steam out & ruin the joint when you try to solder it. If you get a 1/8" or longer tongue of melted plastic extruded from under the joint, you're over heating it. Get the gun hotter & work faster! | ||
| Mike Procopio (Pupz308)
Member Username: Pupz308 Post Number: 478 Registered: 10-2002 |
Verell, Thanks very much for the notes! This past weekend I received the new glass fuses and got various other supplies. First, you used 60/40 solder, rosin core, right? What diameter? This past weekend, I picked up a Craftsman 100/140watt soldering gun. Sears also sells a 150/230watt gun. Verell, I'm thinking that the more powerful soldering gun would be better for this job? Barney, would very much appreciate pictures of the fusebox when you get a chance! Thanks guys! I hope to tackle this on Sunday. | ||
| Hans E. Hansen (4re_gt4)
Intermediate Member Username: 4re_gt4 Post Number: 1631 Registered: 4-2002 |
Oh, and PS: You're right, Verell. It's difficult to solder the 'box w/o some plastic distortion. I used a 150W gun on mine, and I wish it were a little hotter, as it should have made things go faster, with perhaps a little less damage. | ||
| Hans E. Hansen (4re_gt4)
Intermediate Member Username: 4re_gt4 Post Number: 1630 Registered: 4-2002 |
Verell: I've used zinc chloride in the past as a flux. Any idea if this is OK for 'heavy' electrical stuff? (By 'heavy', I mean real copper chunks, not tiny, sensitive PC boards and parts.) I'm assuming that the zinc chloride plates the copper/brass w/zinc, which solders very easily. I know that using this makes soldering VERY easy, but I'm not totally sure of corrosion issues. In any event, whenever I've used it, I thoroughly clean everything afterwards. It's very water-soluble. | ||
| Verell Boaen (Verell)
Intermediate Member Username: Verell Post Number: 1047 Registered: 5-2001 |
I just finished soldering Barny's fuseblock last night & mailed it back to him. Didn't have time to take photos as he needed it back to get his car on the road for this weekend. I did ask him to take photos & post them to the thread where we were discussing soldering the fuse block: http://www.ferrarichat.com/discus/messages/112/295875.html?1060045557 Here are some comments from my eMAIL to Barney Guzzo: "Soldering the doubled-up connectors that were rivited thru the plastic to bus bars was tough! I was sweating every one of them! Wish I had the old 200W Weller gun we had back in the TV shop I worked in while in high school. My 140W gun was barely up to those connections. Worked fine for the rest of them. Sure wouldn't want to try to do this with a 100W gun, or a cheap gun. Would have melted the entire block fer sure!. Also, couldn't help touching the soldering gun's tip to some of the raised plastic separator ridges. the space is just too tight. Kept the heat to the spring brass contacts to an absolute minimum, I'm not worried about them loosing tension." Another few comments: Soldering a fuse block is a compromise situation. Don't try to make the joints flow perfectly uniformly. It takes a very hot joint for solder to flow uniformly & level itself out. If you try to get that kind of flow you'll badly melt the fuse block's plastic. The trick is to get the solder to flow & tin the metal where it's needed with a minimum of residual heat. Whenever possible hold part of the area being soldered with some fairly heavy needle nosed pliars they'll act as a heat sink & help cool the terminals down before the hot plastic has a chance to flow. Too little heat & it won't penetrate & 'tin' (ie: alloy with)the surface and/or it will cool too quickly & crystalize leaving a weak joint. Andy, re:"using a paste flux so the solder flows into the connection." Almost all paste fluxes are acid fluxes for plumbing, etc. they'll start corroding things in a couple of years. A medium gauge electrical rosin core solder will wick under the rivits just fine as long as you've removed the tarnish from the area. A rosin flux does contain some acid, just nowhere near as much as a soldering paste. (There may be electrical grade paste fluxes, that I've just never seen. In which case they should be ok.) Just use a couple of different sizes of dremel stainless steel brushes, or a piece of a stainless steel 'toothbrush' to polish all tarnish off of the entire area to be soldered. | ||
| Andy Falsetta (Tuttebenne)
Junior Member Username: Tuttebenne Post Number: 217 Registered: 3-2003 |
There's a lot of good information in this string. Joe Ruotolo suggests labeling the wires before removing them. Hans and JRV suggest soldering the rivets to the buss bars, and I concur. Soldering the original fusebox fixes the problem for good and retains all the originality of the fit,finish,and integrity of the wires and lugs. To convert to something else would be counterproductive IMO Andy | ||
| Hans E. Hansen (4re_gt4)
Intermediate Member Username: 4re_gt4 Post Number: 1624 Registered: 4-2002 |
True, true. However, many want a OEM-looking fusebox, or, if they are lazy like me, want a fusebox that is an easy fit w/o modification. The original box isn't too bad once it's been suitably modified. | ||
| J. E. Kester (Dasmafia)
New member Username: Dasmafia Post Number: 3 Registered: 7-2003 |
while the obvious newbie to the discussion, my experience with similar problems in "other makes" of cars led me and my co-horts to the street-rodders market for a complete re-wire kit using modern wafer-style fuses, and even having some extra circuits in the block available for add-ons like an alarm or modern stereo... YEARS later, none of the cars have any problems. obviously ferrraris pose a problem with being a bit more rare than the average bird, but if you have a damaged fuse-box or just want the piece of mind, its not a bad course of action. | ||
| Andrew A. Illes (Andyilles)
Junior Member Username: Andyilles Post Number: 174 Registered: 10-2002 |
Many fuseboxes later... I concur with the solder the the rivet connections, using a paste flux so the solder flows into the connection. The"stock" fuses will work fine, but go to any electrical supply house and get some "Alnox", or equivalent, and smear the contacts. It prevents corrosion, plus, insures the connection. | ||
| Mike Procopio (Pupz308)
Member Username: Pupz308 Post Number: 468 Registered: 10-2002 |
Ah-a! But those glass fuses are not the ones that will fit in the OEM fusebox... The ones we can use are GBC glass fuses, which do not require a new fusebox--they're glass, but have the little points on the end. Here's a picture. The GBC one is on the bottom. The one on top is a different (more common) style. I got the pictures from http://www.globelectric.com/21.html. 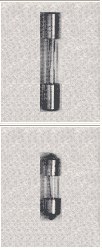 | ||
| Mike Procopio (Pupz308)
Member Username: Pupz308 Post Number: 467 Registered: 10-2002 |
Here's a thread with a photo of an aftermarket fusebox in the stock position using glass fuses. http://www.ferrarichat.com/discus/messages/256120/202907.html | ||
| dave handa (Davehanda)
Intermediate Member Username: Davehanda Post Number: 1407 Registered: 5-2001 |
Mike, I don't think it matters all that much what the cleaning agent is (any electrical contact cleaner), in fact a dry Scotchbrite pad would probably work just fine. Cut it into small pieces. BTW, I had a 78 308 GTS that had 15k miles when I got it, and 34k miles when it departed, and never had any troubles with the fuse boxes. Early on though, I did remove all the ceramic fuses, wiped all the copper tabs with a alcohol soaked cloth, gently bent all the tabs a bit closer together (to hold the fuses tighter) and installed the previously mentioned Buse glass fuses with the stainless steel endcaps. Worked fine the 2.5 years I had the car. | ||
| Hans E. Hansen (4re_gt4)
Intermediate Member Username: 4re_gt4 Post Number: 1600 Registered: 4-2002 |
You guys are going way over the top on this. The OEM fuse box is *ENTIRELY FINE AND ADEQUATE IN EVERY REGARD" - except one: The connections are riveted. This, in theory, should be fine. However, age takes it's toll. Eventually the connections get a little corrosion. Basic Ohm's law: P=I2R. A little resistance makes big heat, which just make the problem worse. More resistance as the parts corrode just a little more. So, it's extremely simple. Eliminate the resistance. No more problem. The OEM fusebox works just perfectly under such circumstances. How do you eliminate the resistance? SOLDER THE CRAP OUT OF THE FUSEBOX. Make *every* connection "solid". No more resistance, no more heat, no more corrosion. Under such circumstances, the OEM fusebox is more than adequate. Just fix what you have, don't try to re-engineer it!! There is no reason to. | ||
| Mike Procopio (Pupz308)
Member Username: Pupz308 Post Number: 466 Registered: 10-2002 |
I concur that there is a discrepancy in what the owners manual calls for for fuse amperage rating, and what is indicated on the decal on the top of the box. I don't know off hand which one (but will post back shortly). | ||
| Jay Grande (Jay)
Intermediate Member Username: Jay Post Number: 1449 Registered: 10-2001 |
At first I did. I was considering the modern style blade fuses. I didn't do this because speaking to a Ferrari mechanic about the boxes I was told that the box would be sound if looked after correctly. You can't expect a terminal to run both fan motors, the radio and the instrument cluster (okay I'm making this up but you get the point) and not overheat. I also found that the decals on the boxes were not correct according to the owners manual. I put all fuses to the Owners manual specifics, not what was on the fuse box caps. I'll post pics of the new boxes in a day or two. | ||
| Mike Procopio (Pupz308)
Member Username: Pupz308 Post Number: 465 Registered: 10-2002 |
Joe, great input--appreciated very much. Can you (or anyone else) recommend a good cleaning agent for the fuse terminals, rivets, and fuse holders (i.e., all metal fuxebox parts)? Also, I definitely agree that it's a good idea to replace all the fuses, and as Jay points out to restore the fuse rating to factory spec for each location. | ||
| Joe Ruotolo (Gtb24733)
New member Username: Gtb24733 Post Number: 3 Registered: 7-2003 |
As a director of engineering for a mechanical/electrical engineering firm, may I suggest that you 1) sticky-tag each wire with its respective position on the fuse block, 2) inspect the condition of each connector (on the end of each wire) and, if necessary, clean it with the same de-oxidizer that women use to clean cheap jewelry (while giving plenty of time for air-drying, say, overnight), and lastly, 3) check all wiring, prior to re-connection, for cracks, burrs, or heat-checking. I believe that fuse box replacement should really be a straightforward effort, so long as one doesn't misplace a wire. (I would also suggest replacing all the fuses at this time, as well. This will ensure that the owner before you didn't mis-rate a given fuse, causing excess heat in the fuse box, possibly lending to the problem you're encountering now.) Best regards, Joe | ||
| Mike Procopio (Pupz308)
Member Username: Pupz308 Post Number: 464 Registered: 10-2002 |
Jay, thanks for the input. For the archives, Jay is referring to the following fuxebox-related thread: http://www.ferrarichat.com/discus/messages/112/295653.html?1059532964 Jay, did you consider using any other fuse type in your restoration? | ||
| Mike Procopio (Pupz308)
Member Username: Pupz308 Post Number: 463 Registered: 10-2002 |
I'll start off with a few thoughts. First, I'm feel like I'm getting voltage loss after the fusebox. I will measure specifically this weekend, but I can notice speed drops in the operating of the cooling fans and on the blower motors. My voltmeter, when hooked up through switched voltage on the fusebox, does not read what the battery is putting out at the terminals. I've had intermittent connections at the fuse terminals... Getting lots of heat in there, too. One possibility is to buy two new fuse boxes, say, from a FerrariChat sponsor who may have them for sale. It seems to be an expert consensus thought that this is a temporary solution, because the fusebox design is flawed, and that the fuse boxes will fail eventually. Some folks seemed to have luck with these three steps: 1. Solder all of the rivets (could someone elaborate on this?). 2. Clean all of the fuse terminals and fuse holders, and tighten the fuse holders by pushing them inward, making a stronger hold on the fuse. 3. Replace fuses with some other type of fuse. Some people use blade fuses with an aftermarket fusebox from NAPA (is this an easy "bolt-in" replacement)? Others use BUSS Glass "GBC" fuses... Any perspetive here? 4. Do something to reinforce some of the fuse terminals on top that carry the most current. Can anybody suggest a "best practice" to refurbish this? I'll take lots of pictures and make a nice pretty document for all once it's done. | ||
| Jay Grande (Jay)
Intermediate Member Username: Jay Post Number: 1448 Registered: 10-2001 |
Mike, as I stated in the other thread, many people simply put in higher fuses rather than find out why it is popping. Take the wiring back to original. Remove added wiring for amps, radios ect and make sure that fuses are correct for what you are running (see owners manual). Then inspect all the connectors, if they are corroded or if the wires are burnt, cut them back or replace them. Use quality connectors and solder. Don't overload a circuit by adding wires to existing terminals. See the pic I put in the other post, my box was melted! The previous owner had wires all over the place and the entire fuse box had 25A fuses...and they wonder why they melt! | ||
| Mike Procopio (Pupz308)
Member Username: Pupz308 Post Number: 462 Registered: 10-2002 |
This weekend I'm dedicating to restoring the 308 fusebox. I want to document this from start to finish so everyone who hasn't done this can benefit, and so we can have our thoughts on this recorded in one place once and for all. I've done a lot of reading in the archives, and have come up with lots of little bits and pieces here and there. I was hoping to start a discussion to get everyone's thoughts and experiences on this together. 1. What problems have you had with your 308 fusebox? 2. What specifically have you done to correct it? |